The tomato requires a long warm sea sun to mature its fruit. Consequently, in the northern states, its early life must be lived “under glass.”

That is to say, the seed must be sown about March 15 in a greenhouse or where conditions are similar.
Maintaining A Night Temperature
In the small greenhouse opening out of the cellar of my dwelling is a small electrically heated propagating case in which a night temperature of 60° degrees Fahrenheit can be maintained automatically.
Even though the greenhouse temperature may drop to 55° or 50° degrees Fahrenheit, which it should, to accommodate certain cool house flower crops which I grow during winter and spring.
The propagating case affords a suitable atmosphere in which to germinate tomato seeds.
Standard Varieties
Ordinarily, I use two standard varieties, Bonny Best for an early crop and Mar-globe for a later.
I am often tempted by the alluring descriptions of the seed catalogs to include some new variety as an experiment.
Burpee’s Hybrid tomato
In 1946, I tried Burpec’s Hybrid tomato and was so pleased with it that I will grow it again this year.
A packet of seeds of each variety will furnish plenty of plants for my garden friends and myself. I use “certified” seed which is said to be disease free.
Sowing The Seed
For sowing the seed, I use a plant box, or, as the professionals term it, a “flat.” Mine are approximately 11 1/2 x 16 1/2 overall with a depth inside of 2 ¾” inches—and I don’t care to lift any that are larger.
The flats have drainage holes in the bottom, and sometimes, due to the shrinkage of the wood, cracks appear.
The holes are covered with pieces of broken flower pots, and the cracks with pieces of lath.
Partly rotted leaves are placed in the bottom of the flat to prevent the soil above them from clogging the drainage.
Composting The Soil
The soil comprises one part garden loam, one part manure, one part builders’ sand, and one part compost.
My compost results from the decomposition of the leaves of trees. plants of snap beans that have ceased to bear lawn clippings.
Weeds that have not gone to seed discarded lettuce and cabbage leaves, radish and beet tops, and other vegetable matter which is not woody.
I always have a compost heap in the making. This is my potting soil for most of my plants, and I fill the flat for the tomato seed slightly more than half.
Finer Composed Soil
A finer soil composed of one part sifted builders sand, one part sifted garden loam, and one part sifted compost mixed until its color is uniform, not streaked, fills the remainder of the flat.
The sieve used for this soil is the same as that used for the soil in the bottom of the flat, with four openings to the square inch.
Rubbing of Compost Soil
I rub the compost through it, but neither the sand nor the garden loam; what does not shake through is discarded.
In the case of the sand, the refuse will be stones or other foreign matter, and the lumps left from the loam will be stones and nodules largely composed of clay which is not good soil for seed germination.
Marking the Soil’s Surface
The surface of the soil I mark off into three equal miniature beds, and I sow one variety of tomato broadcast in each.
The seed is pressed into the soil with a smooth wooden block, and ¼”-inch more of the upper soil is sifted over it with a sieve whose texture is that of ordinary wire mosquito netting.
Watering from Below
In each bed, I stick a plant label with the name of the variety and the date of sowing. The flat is then set in a pan of water until the soil surface becomes moist.
This is termed “watering from below” and moistens the seed without disturbing it.
The flat is now covered with panes of glass, and on the glass, I place paper and weigh it with pieces of broken pots or small stones so that it will not be displaced.
This helps to retain the soil moisture. Finally, the sowing of the seed is completed, and the flat is placed in the propagating case.
It is examined from time to time to note progress and to ensure that it does not dry out, which might prove fatal.
When the little plants break through the soil, the paper and glass are removed, and when the plants are about an inch high, I remove the flat from the propagating case.
The Air Of The Greenhouse
The greenhouse air is somewhat cooler, making for slower but sturdier growth.
After the second, or true leaves, appear, the plants should be transplanted with as much soil as possible attached to the tender roots.
I transplant partly into flats of the same dimensions and partly into others of half size. I space them so the larger flat holds 30 plants and the smaller 15.
The soil used is the same as that used in the lower half of the seed flat, but the upper part is sifted through a sieve with four holes to the square inch.
This removes sticks and stones and facilitates using the dibble (pointed stick) to make holes to receive the plants.
Watering of Plants
After the plants are set, water them carefully with a spray so that the tendency will be to settle them rather than disturb them.
Try to apply it between the plants. I bet each variety and shade them for about three days.
The plants remain in these flats in the greenhouse, well-ventilated on warm clays, until the weather is such that they may be set in the garden.
Booster of Plants
In the latitude of New York, the date is June 1 or slightly before. A light application of 5-10-5 fertilizer, scratched in, is a “booster.”
If the greenhouse is crowded, the flats may be kept in a cold frame with the sash on at night to guard against late frosts.
From seed sown in the greenhouse about December 10, I have sometimes matured tomatoes inside before they are ripe outdoors.
Growing Young Plants
The young plants are grown in the manner described above but are kept in the propagating case longer because of the lower temperature of the greenhouse in December.
I transplant the seedlings into 3” or 4” inch pots and let them continue to grow for a while in the propagating case but not long enough to become “leggy.”
They are brought into the lower greenhouse temperature if they show this tendency.
When the plants are 6” or 8” inches high, I pot them in 8”-inch pots in the potting soil referred to above.
I set the pots on the crushed stone of the bench, each pot vertically beneath a sash bar that supports the glass of the greenhouse roof.
Pruning of Plants
The plants are kept pruned to a single stem by means of a bamboo cane, and a string is led to.
Along the underside of the sash bars from which, they are supported by a string roven through brass screw eyes inserted in the sash bar.
If brass screw eyes are used, they will not rust and will not cause the wood of the sash bar to rot.
Forcing Michigan State Variety
Last year I tried a forcing variety called Michigan State. Greenhouse tomatoes ripened on the vines are of delicious, delicate flavor and appear to be rather free from acid.
More than once, I have enjoyed salads made from them and lettuce from a cold frame or the early garden.
Combatting White Flies
The best thing that has been found for combatting white flies, which bother tomato plants, is a bag of dust composed of DDT, rotenone, Fermate, and sulfur.
Use a dust gun and apply it to the underside of the leaves. Cryolite dusted on the young.
Plants will deter the flea beetle, a small black jumping insect, 1/16” of an inch long, which makes holes in the leaves.
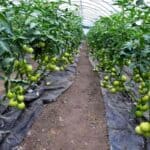
Growing Tomatoes In A Rack
In my garden, I grow tomatoes on an inclined trellis or rack, which resembles a hurdle. The accompanying sketch shows a rack arranged to support plants only on one side of it.
But during the war, when we were all urged to grow vegetables, I endeavored to grow more vegetables and added more 1” x 2” inch strips on the opposite side, which permits supporting plants on both sides of the rack.
I set the plants vertically tinder the lowest 1” x 2” inch strip and two feet apart in the row.
The rack is made of ten 1” x 2” inch strips 16 feet long, 12” inches center to center, nailed at the middle and about 14” inches from the ends to legs 1 ¼” inches x 3” inches x 6 1/2 feet long, these bluntly pointed at their lower ends.
6” inches from the top of the leg, it is loosely fastened to its neighbor by a ¼”-inch bolt with washers.
When the legs are spread apart and their pointed ends thrust into the soil, a firm trellis or rack results to which the tomato plants or vines, as they are often called, may be tied.
The topmost 1” x 2” inch members are placed 6 ½” inches below the bolts joining the legs. When not in use, the racks are folded and stored.
I use two such racks, and they serve nearly three dozen plants set in different places each season to get all the rotation possible in a hack yard garden!
I try to set them on the north side of the garden so no shadow will be cast on lower plants. Sometimes they are set one behind the other, and at other times end to end.
Double-Row Plants
In the latter case, they provide a continuous double row of plants should the row be longer than 32’ feet.
I set a rack adjacent to each end of the row and filled the space between the racks with pieces of 1” x 2” inch strips lashed to similar pieces of the racks.
To make a good appearance, the racks should be in good alignment. Mine are green.
In setting tomato plants in the garden, I mix 5.10-5 general garden fertilizer with the soil at the bottom of the hole.
I make the holes deeper than the flat from which the plants are taken, especially if they are a bit “leggy.”
Tomato: Stem-Rooting Plant
The tomato is a stem-rooting plant, and the part of the stem below the ground will develop roots and make the plant sturdier.
When the plants reach a height of about 18” inches, I often put a ring of 5-10-5 about 6” inches from the stems and scratch it in.
The tomato vine is plentifully supplied with stems and leaves. I remove enough new stems from time to time to limit the vine to the main and two branching stems.
They may be “rubbed out” with the thumb when young or cut off with a sharp knife or pruning shears when they are older and really look like a stem or branch.
At first, they look like leaves. Stems are tied fan-like to the trellis.
Tomato Vine
The tomato vine is a long-suffering patient individual and will yield some fruit even if not coddled as described.
The tying keeps the fruit tiff the ground, and the pruning admits more light resulting in better fruit.
Aligned racks with healthy vines, wails pruned and neatly tied, and fall of ripening fruit is a satisfaction to the grower and a thing of beauty to the eye of the visitor from the city, who hardeneth not.
44659 by John H. Myers