You will discover many advantages in knowing how to increase perennials in this way. I do it mostly for fun, as a hobby.
I like to discover how many of my garden plants I can propagate by stern cuttings. Also, I like to exchange perennials with many other gardeners.
My choice plants may not be large enough so I can divide the roots, but nearly all can spare a few stem tips.
Cuttings In Early Spring
I start taking cuttings early in spring when perennials are 6” or 7” inches high and continue every two or three weeks until the end of July.
Some plants root best from tender, young shoots. Others root more successfully when the wood has hardened a little but is not yet too hard.
Begin experimenting. You will be surprised at how many perennials will root readily without much regard for the condition of the wood or the time of year.
Take a slip of all the kinds you have in your garden and try rooting them. Small cuttings take little space in cold frames or containers.
This is the quickest way to learn, which is easy-rooting and difficult. The big thrill, of course, comes when you conquer the stubborn ones.
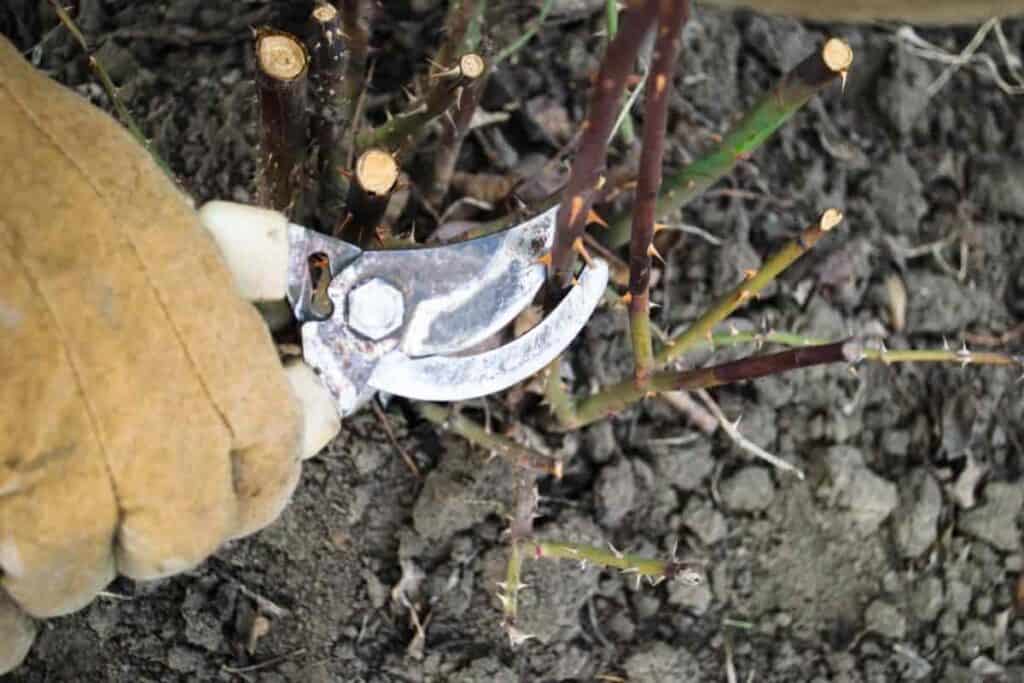
Take cuttings early in the morning when there is lots of moisture in the plants. Use a sharp knife and cut just below a node or place where a leaf is attached to the stem.
Cuttings should be three to five inches long. If flower buds are present, remove them.
If the foliage on the cutting is heavy, snip part of it off with scissors. Also, remove lower leaves that might touch the rooting medium.
Pro-Con On Retaining Foliage
Using cuttings with many leaves may make them wilt. On the other hand, you can keep the air humid around the foliage to prevent wilting.
It is wise to leave most of it on, for the cutting needs the food stored in these tissues. Experience is the best guide in this matter.
I am often asked whether or not slips should be placed in water before being inserted into the rooting medium. My answer is no.
You want the cut end to dry and form a sort of protective varnish over the sensitive tissues. This helps prevent decay.
Rooting Mediums
Keep the cuttings cool, moist, and shaded until you are ready to insert them into the rooting medium as soon as possible.
This means that the rooting medium should be in the containers, or the cold frame should be well prepared before you take the cuttings.
Several rooting mediums are satisfactory. I use vermiculite. Many authorities suggest coarse, clean sand.
Eighty percent sand and 20% percent peat moss is a good combination as peat helps to hold moisture.
Using Rooting Hormone
Sphagnum moss and perlite are highly recommended, too. Some perennials root easily in just plain soil.
I usually use a rooting hormone on my cuttings before inserting them, but this isn’t absolutely necessary.
It helps them root a little more quickly, which is advantageous for some perennials. Various such hormones are on the market, most containing indolebutyric acid.
I have made the mistake of using too much of the hormone. Follow directions carefully, or the treatment may do more harm than good.
You’ll Need An Enclosure
The best place I know to root stem cuttings is in the cold frame. Here you can control the light, moisture, and humidity well enough to put the cuttings in and forget about them.
Lacking a cold frame, you could use different containers such as clay pots, plastic shoe boxes, aquariums, or metal boxes. All should have good drainage.
Place the cuttings about one-third of their length into the rooting medium, close together, so the leaves don’t touch.
Press the rooting medium around the base of each plant and water the cuttings well immediately after insertion.
Clay Pots Used For Cuttings
If cuttings are in clay pots or other small containers, you’ll have more trouble retaining humidity than if the cuttings are in the cold frame.
But with plastic film, it is simple to create a miniature greenhouse over pots for almost no cost.
Simply slip a plastic bag over the tops of the plants and fasten the open end to the pot rim with a rubber band.
If cuttings are in flats or oblong containers, make hoops of bent wire to hold the plastic above the plants. Tuck loose ends of plastic under the container.
Getting the Right Light, And Ventilation
I tack old sheets over the sashes when using the cold frame for cuttings. This seems to allow just the right amount of light.
I close the frame, leaving one sash open a little to provide ventilation. Some perennials will root easily without high humidity.
I am thinking of summer phlox, chrysanthemums, Lythrum, sedum, and forget-me-nots. They also will root under a wide range of temperatures. An ideal is between 70° and 80° degrees Fahrenheit.
Truthfully I have never been particular about temperature and would not advise beginners to be too concerned about it.
Ready For Transplant
When new roots are about ½” inch long, the cuttings are ready to transplant.
Usually, as soon as roots have developed, the little plants begin to grow like mad, and there is no mistake about their readiness to transplant.
Remember that after a rootless cutting has used up its own stored food, it will have none unless the rooting medium contains plant food.
After my cuttings have been in the cold frame for about a week, I sprinkle a little liquid fertilizer between the rows.
Suggestions For Rooting
It’s really more fun trying to root difficult plants. So here are a few suggestions for working with these:
1. Be sure that cuttings come from healthy and nourishing plants.
2. I usually prefer tender, new shoots, but when I have trouble with rot, I try wood that has hardened some.
3. Though most cuttings like warmth and moisture, those with woolly leaves may rot under these conditions, so try more ventilation, less heat, and less moisture.
4. Some perennials root better if there is bottom warmth. If it’s convenient, try applying a little heat with a small heating cable, perhaps five to ten degrees warmer than the air above.
5. Sappy cuttings, such as some cacti, may be difficult since the cut ends by plunging them into hot ashes or using potassium permanganate to prevent draining from the cut surface.
6. If you feel the wood is too hard to make good cuttings, trim the plant back in two or three weeks. There will be many tender, new shoots.
Notes To Remember
It is wise to keep simple notes.
Jot down the wood’s condition, the date cuttings were taken, the rooting medium used, the amount of humidity, moisture, and light, and how long it took the cuttings to root.
These will help in your next attempt.
44659 by Cleo Dubois