“Go West, young man, go West!” was the cry of yesteryear, and an era of progress followed in the wake of turning wagon wheels.
I have been saying, “Go North, young Am’ (Amaryllis), go North!” and have delightedly watched the progress of these tropical bulbs in gardens further North, not just over summer but over winter like any hardy perennial.

Perhaps I never would have begun this parade of adventuresome bulbs from pot to garden spot had it not necessity stepped in and insisted.
My increasing interest in the amaryllis resulted in a growing collection of bulbs that occupied every available place in the house. I soon saw this would never happen.
I would have to eliminate the less desirable plants, but when that time came, I found that they were all desirable and could not be thrown away.
I recalled rather bitterly how luxuriously the amaryllis flourished in the gardens of our deep South year in and year out.
Wasn’t there some way these lovely aristocrats from the tropics could be induced to come into Northern gardens and survive from year to year?
1956 Spring Experiment
There must be some way, I thought, to winter them outside as far north as Wichita, Kansas, at least. Our winters sometimes get pretty cold—down to zero and lower. However, an experiment would be worth trying.
If I succeeded, then a new era for amaryllis in our more Northern gardens would be encouraged. If I failed, the loss would be comparatively small since I decided to start with a few of my Meade varieties which could be easily replaced.
So, one spring (1956), I placed my first bulbs by the fish pond. A few feet to the north was our neighbor’s garage, which I figured would afford good protection from severe freezing winds.
These bulbs grew well all summer. Then came the winter blasts, during which time, from the warmth of our house, I looked apprehensively at the place where I had buried the bulbs.
Although a 6 to 8-inch mulch of straw and leaves covered the spot, I could imagine the worst things happening down there—after all, our thermometer was registering three below zero!
When spring finally arrived, other plants were blooming, but where I had planted my bulbs was dark and lifeless. It was around the first of May, and no sign of life. Another week went by. No life.
I ran my fingers gingerly here and there on the ground, hoping to discover one of the bulbs.
No luck. Give up, I told myself. It can’t be done. We had another cold snap which finished the green beans before it warmed up.
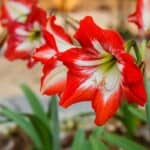
One day when out by the pond, I made a great discovery. Right before I saw the familiar points of amaryllis leaves just peeking through the soil, dark green with a bronze edge—a picture of health!
In a short time, sturdy flower stalks appeared, and a little later, we were rewarded with a display of bloom that surpassed anything in our garden.
Amaryllis in bloom is a wonderful sight anywhere, but that spring, as the brilliant flowers nodded approvingly, I took it as a herald of greater things to come for our future garden.
It has been five years since I introduced the first bulb to the garden, and I have been highly pleased with the results. True, there have been losses, but I expected these as I searched for a way to winter them outside, wintering some one way and another.
There is no question in my mind that the amaryllis deserves a greater place in our gardens. Few plants can surpass it for the beauty of foliage and flowers or freedom from disease and garden pests. However, its extreme tenderness has prevented its use in sub-freezing areas.
Thus, for adventuresome folk who love the beauty of the amaryllis and who would like to see them in their gardens as perennials, I will try to pass on some of the things I have learned about wintering these bulbs and having them come through the following spring with rich blooms of eye-catching handsomeness.
Successful Wintering Bulbs
Two things are all-important in the successful wintering of these tender bulbs.
First, LOCATION. Second, MULCHING. My experiments have proved that the safest place to plant is on the south side of a building or a wall.
This will afford needed protection from the north and allow the warmth of the sun to raise or maintain a safe soil temperature through the winter.
Though heavily mulched, every test bulb in the open garden took a severe beating.
Out of ten bulbs in one row, eight were frozen, and two barely came through alive. I’m not sure, but I’m inclined to believe they made it because they may have been inherently a little harder than the others. In a semi-open place, 50 percent of the bulbs froze.
But where I had solid north protection, open to the south, I have not lost one bulb in five years! The original bulbs are thriving, increasing yearly, even though we have had periods of five below zero.
Choosing Location
One must not only choose a location to avoid winter freezing but also protect from the fierce summer sun.
Strange as it may seem, I fear the summer heat more than the winter cold.
Yet, a little thought will save plants from disaster in the summer. For example, a place south of the house might be perfect for winter protection but a veritable furnace during the summer. Avoid such a planting area.
Find a place along the foundation that will give maximum winter protection but which will get a little summer shade through part of the day.
Amaryllis can indeed stand a lot of sun—but not the burning sun we know in Kansas, which may stay at 105° degrees Fahrenheit all day with not a cloud in sight.
Strive for dappled or partial shade.
Providing Good Soil
If you intend to make your amaryllis a year-round resident of your garden, you must abandon the rule of planting the bulb with a third of it protruding above the ground.
I plant them so there are at least 2” to 3” inches of soil above the round part of the bulb.
I have seen bulbs planted that deep and even deeper in Southern gardens. When they were dug, they looked like large turnips. I am convinced the secret to good bulb growth is establishing a well in good soil.
Amaryllis is not an apartment hunter. They do not like to be moved; when you do have to move them, easy on those live roots.
Soil Mixture
I work in peat moss, sand, and bone meal. Soil that tends toward a concrete-like consistency when dry is fatal. Amaryllis do not have hairy roots that push through hard materials after moisture.
Unless the soil is always soft and flaky, the thick, fleshy roots of the amaryllis will just lose their enthusiasm for growing and be content to survive as a little bulb with a few leaves until conditions change.
Once in the spring, I give each bulb a good meal of bulb food and work around the plant; and then once again in midsummer to build up the bulb for next season’s bloom. If your soil is good, this should be enough. Otherwise, you may want to give them a little liquid fertilizer through the season occasionally.
Some locations require more than others. When it grows vigorously, you can hardly overwater the amaryllis in the summer, and drainage is normal. Don’t be afraid to splash them well with a gentle spray.
Like our children, they like a little water in hot weather every day. Watering in the late afternoon is usually best.
Mulching
Mulching is the second big item to consider in wintering amaryllis out-of-doors.
After the first frost, you can cut the tops off even with the ground. The bulbs will be safe enough now until cold weather starts to set in.
We usually don’t have much ground freeze here until around Christmas, but, to be safe, I anticipate this and begin building up my mulch anywhere from six to eight inches or more, depending on how well-protected my growing spot is.
I have yet to find Amaryllis, which has poked its head up too early in the spring and been nipped by Jack Frost. They seem to know when the cold weather is over.
This is probably because they will not grow much until they feel warmth, and by the time the sun is warm enough to warm the soil, the danger of frost is history.
So, in May, I usually remove the mulch, all except about an inch or so, just in case and also because I like to have a little mulch around them to conserve moisture during the summer. The leaves come easily through the mulch.
There is room for experimentation to find the best type of mulch. I have had success with alternate layers of straw and leaves.
Something that will not pack down is preferable. Remember, you want insulation, not a cold pack.
The dormant bulb will not mind things being on the dry side; therefore, arrange for a mulch that allows for breathing, dryness, and insulation.
Plants In Pots
I had 18 plants in pots south of the house, plunged into the ground about an inch deeper than the top of the pot rim.
Over these pots, I laid a ten-inch mulch of dry grass and leaves. Over this, I stretched an old canvas to shed water.
After two or three months of dormancy, I began to take a pot or two into the house, thus affording a constant display of flowers from February to May.
Some of the plants put their stalks up first, so when they finished blooming, and before they could put up leaves, I cut the flower stalk off and put the plant back in its place outside until spring, when it continued its growth as though nothing had happened.
This saved me a great deal of work and unsightly pots in our limited space indoors.
In short order, here’s the recipe for amaryllis outdoors where the winter is cold: stay to the south of the building, plant deep, and mulch well. Don’t experiment with your best amaryllis first!
Next spring, start with a few commoner sorts in suitable locations and see what you can do with them in your outdoor garden.
It will be interesting to see how far North, under favorable conditions, the amaryllis can be wintered outside as a permanent addition to the garden.
44659 by Leonard E. Lindsted