On a spring day back a year ago, I enjoyed a tour through one of the Deep South show gardens when our guide pointed toward a passage through a hedge and said, “Now we look at the Amer-gorillas!”
I was prepared for anything since he had shown us the “high-biscuit” bushes earlier. But it was both a surprise and a pleasure to find, beyond the hedge, a quarter acre of the most colorful flowers imaginable – big lily-like trumpets in red, scarlet, orange, salmon, and combinations of these bright hues, some with white and green markings. Hardly any two were exactly alike.
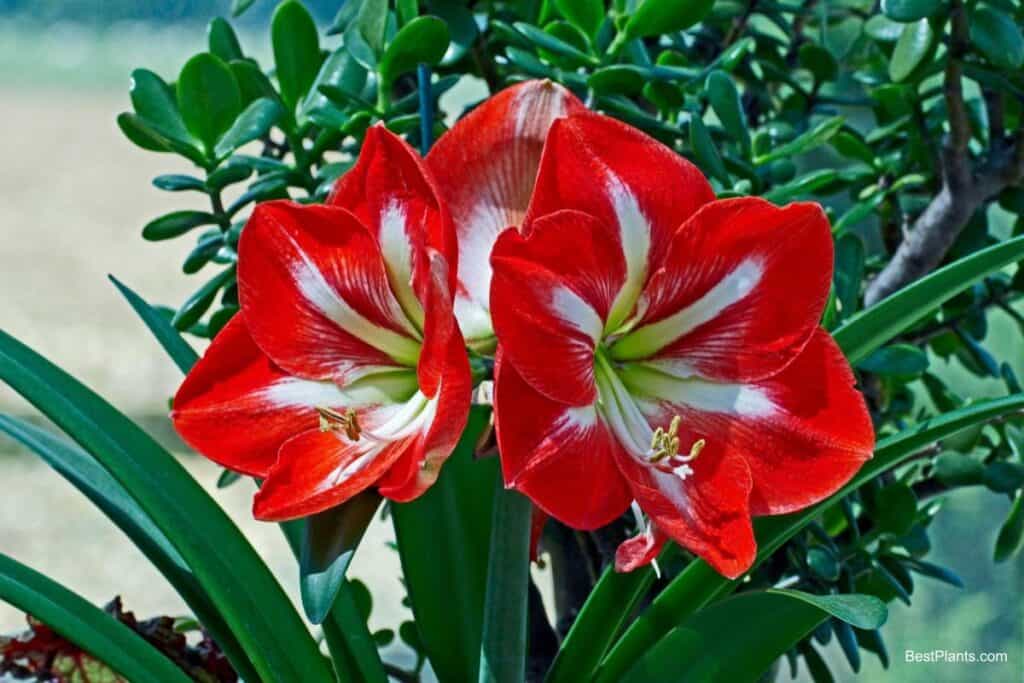
These striking blossoms rose from the ground on stout stalks among broad and strap-shaped leaves.
When I learned that these gorgeously colored “lilies” would thrive farther north, under the simplest of pot culture in a winter window garden, I became an amaryllis fan, and I have had one ever since.
It is heartening to see the significant progress made in the culture of these flowers in recent years – both in growing methods and in the availability of fine stock.
Fifteen years ago, American hybrids were produced under outdoor field cultivation.
Florida and California were about the best the average gardener could hope to have. Fortunately, these weren’t bad at all. The Mead strain hybrids from Florida Lad aroused my first enthusiasm.
But we’d read wistfully of the broad-petaled, “open-faced” amaryllis aristocrats imported from Holland and England, which were nurtured in the greenhouses of great estates.
Occasionally, these better types could be seen in botanical gardens or special exhibitions, such as the amaryllis show in Washington, D. C.
Good Months For Amaryllis
Today, you can buy these Dutch amaryllises of a fantastic size, perfect form, and colors to suit every taste for a few dollars.
Furthermore, we’ve learned that they don’t need pampering in a greenhouse. They’re pretty at home in living-room windows.
November, December, and January are good months for starting the bulbs.
I prefer December, but it is not always possible to get delivery of Holland-grown stock until after the holidays, except in the case of certain new, specially treated early-flowering amaryllis.
By late February, unplanted bulbs are likely to show signs of impatience. Without the benefit of soil, water, or even light, they may push out buds which will either blast or open into poor quality flowers.
But, this is not always so. The bulb of Mignon was not planted until March 20 last spring, yet it grew promptly and gave three bloom stalks in April.
The size of the bulb planted will mainly determine the number of blooms you get in the first year. A bulb with a 2 1/4″ inch diameter is a minimum “blooming size” in most strains.
Many of the high-grade imported amaryllises we get now are 22 to 24 centimeters in circumference, a generous size (about 3″ inches across). They usually give two good stalks and sometimes three.
Pots For Amaryllis
You can get all sorts of advice on the size of pots for amaryllis. Some gardeners will tell you a 3″ inch bulb needs a 5″ inch pot; others will recommend pots up to the 8″ inch size. Following the lead of most expert growers, I use 7″ inch and 8″ inch azalea pots for all of my choicest amaryllis the ones that are kept under permanent pot culture.
I have several dozen amaryllises, hardly in a class with named Dutch hybrids, yet much too pretty to discard.
These are grown under a modified gladiolus culture method suggested in the writings of the late T. A. Weston.
In late December, they’re set in relatively small pots of 4″ and 5″ inch size to flower indoors sometime in March.
When the weather becomes warm and settled, I turn these plants from their pots without disturbing the roots and shift them to a ground bed, where they grow all summer.
In fall, they’re dried off before heavy frost, lifted, and rested dormant in the cellar until the potting time comes again.
Soil For Amaryllis
Amaryllis are highly adaptable to soil requirements, doing well in almost any good garden soil that does not cake or pack.
A standard potting mixture is made of one part of garden soil, sand, and rotted manure. I add small broken pieces of charcoal to this formula, and if the waste available isn’t strawy, I include some partly decayed leaves.
Crock the pot well over its drainage hole. Usually, I screen old manure through a 3/4″ inch mesh hardware cloth for the potting mixture.
Before filling the pot with soil, I place some of the coarser pieces of manure left on the screen over the pebbles and broken crockery in the bottom of the pot.
Any clean fleshy roots attached to the bulb should be spread carefully in the pot and soil worked around them. When you’re finished, the soil level should be about an inch below the pot rim with the bulb sitting on it, something like a duck resting in the water.
Caring For Amaryllis
Amaryllis do not need a rooting period in dark, cold storage, as do many Dutch forcing bulbs. But, newly potted amaryllis should be watered once and then kept in subdued light until some evidence of rooting shows in the growth of a bud or leaves.
For years, I followed and passed along to others the recommendation that a cool room is best for amaryllis at this time.
Last season, I turned to the advice of Holland growers’ and kept the pots in the comfortably warm 70° degrees Fahrenheit living- room, away from the window, until the bulbs were started. The results were so good that I plan to continue the practice.
Scant watering – just enough to keep the soil moist – is the rule in the beginning. But, once amaryllis fills their pots with roots and is in active growth, they’ll need a “drink” more often.
They should be at a sunny window and preferably in a cool room by this time. Cool, well-lighted conditions develop sturdy, well-proportioned plants carrying leaves and flowers simultaneously, and the ‘blooms last longer in cool air.
Since the plants lean quickly toward the light, it is necessary to turn the pots often to keep them growing straight up.
Please don’t neglect your amaryllis once their flowers have faded. The bulbs will be somewhat emaciated by that time and will require watering and feeding all through the spring and summer to rebuild strength and prepare for bloom another year.
Cut off the old stalks and then force all the foliage growth you can by feeding manure water or a balanced soluble fertilizer at two-week intervals.
Growing Amaryllis Outdoors
A few amaryllises may be summered on a sunny porch and other pot plants, but if you have any number of them, it is best to provide a place outdoors where you can sink their pots to the rim or set the bulbs directly in the soil. More on growing amaryllis outdoors here.
Dry off bulbs gradually in the fall and bring them indoors before frost for a rest in a cool basement. Most of the Dutch amaryllis I have lost their leaves entirely, but a few of these and several American hybrids show evergreen tendencies, holding part of their leaves though making no growth.
After two to three months of dormancy, they’re ready to start again. Before bringing them up to light and warmth, I usually take the hose nozzle, gently wash out the top inch or so of soil from each pot, and then replace it with newly enriched soil.
Any large offset bulbs are removed and potted up separately at this time. Under such a routine, you should be able to keep amaryllis established in large pots for three years or more.
Thousands of amaryllis, of course, are grown permanently outdoors in the ground in mild-winter areas and well up into the middle South. However, Dutch hybrids, which have been greenhouse cultivated for generations, are best maintained as pot plants even in the balmy climates of Florida and California.
Few of us have space to grow hundreds of amaryllis – or money to buy them – so we are all indebted to the programs of testing and evaluating varieties. In choosing new bulbs, I am guided mainly by their ratings.