
Increasing shrubs and trees, especially the choice kinds, has long been considered beyond the reach of most home gardeners. The need for such special equipment as electric heating cables, thermostats, humidistats, and automatic ventilation as well as a greenhouse was considered essential for success.
However, in this “do-it-yourself” age, increasing plants in the house or the back yard is relatively simple, if using polyethylene plastic. This material has many uses, particularly for preserving or storing fruits, vegetables, and other kinds of foods. It is used to cover pillows and furniture for packaging and many other commodities.
How does this plastic, used for so many other purposes, fit the needs of the home gardener? Its ability to allow air, in the form of carbon dioxide and oxygen, to pass through the plastic and at the same time conserve moisture makes it ideal for various kinds of root formation.
What Effect is Created on the Atmosphere Enclosed by Plastic?
For example, what happens when a plastic freezer bag is pulled down over a five-inch flower pot so that it is completely enclosed? Since the plastic is permeable to air, it flows in and out, while the water vapor in the air inside the plastic bag is retained, because the plastic is impermeable to the vapor.
Furthermore, the moist rooting medium in the flower pot. is continually evaporating water, which cannot escape, thus increasing the relative humidity inside the plastic. This inexpensive plastic creates, then, one of the most important factors necessary for success in propagating plants — a high relative humidity.
It is because of this factor, more than any other, that most plants are propagated under glass. Without high humidity, cuttings wilt, plants grow poorly, grafts die and seed fails to germinate.
Growing New Plants from Softwood Cuttings
One of the most successful ways of increasing plants, especially when using polyethylene plastic. At the Arnold Arboretum, they make small units with wire, which comes in four-foot rolls, with individual squares, 2″ x 4″.
This can be cut according to individual needs, but a satisfactory size is a structure four feet long, three feet wide and eight inches high. A frame of this size is suitable since it is light, easy to handle, and able to accommodate six flats, measuring 1′ x 2′ x 3″.
Cuttings can be handled in either of two ways. One is to take the cuttings, treat them with the proper hormones and insert them in flats of sand. The other is to insert them directly into the ground. This is accomplished by removing the top six inches of soil and filling it with a rooting medium.
Methods and their Advantages
Cuttings in flats of sand are easily handled after rooting, though the medium dries out fairly fast. Although cuttings in the ground are more difficult to move following rooting, the medium dries out much slower.
The latter method is favorable for those who do not have the facilities to pot up and overwinter rooted cuttings. Thus, they can be left in the ground until the following spring, if suitable mulch is provided against winter heaving.
In either method, after cuttings are planted and watered, place a wire frame over them. Then put a piece of plastic over the frame, cutting it large enough to cover the frame completely, with a four to six-inch overlap on each side. Let the overlap rest flush on the ground, and cover to a depth of two to three inches with soil to seal tightly.
Cuttings covered with polyethylene do not require ventilating daily, weekly, or otherwise, because the plastic allows air to pass in and out. Though the moistened medium is constantly evaporating water, the vapor cannot escape.
As the temperature inside the plastic drops at the end of the day, the moisture in the atmosphere condenses into droplets on the inner side of the plastic, which fall onto the medium only to remoisten it.
Nevertheless, some manual watering is required. If rooting in flats, watering will be needed every two to three weeks, depending upon the amount of shade. If cuttings are in the open ground, water should be applied every three to five weeks. This is because moisture is absorbed by the surrounding soil.
Since the plastic traps heat, when propagating softwood cuttings, place the “greenhouse” in the shade of high branching trees, a fence or wall, or on the north or cast side of a building. Cuttings should have bright light, but not direct sunlight.
When the temperature rises into the nineties and higher, provide additional shade at noon with a layer of burlap, Saran cloth, or cheesecloth. Otherwise, cuttings will likely be burned.
Disadvantage of Polyethylene Plastic
One is that it creates optimum germinating and growing conditions for fungi. These are caused by high temperature, high humidity, and slight air circulation inside the plastic covering.
To control, use the fungicide Captan 50W at a concentration of two teaspoonfuls per gallon of water. A program of spraying the cuttings and medium every week for 10 days should be strictly maintained.
Once rooted, cuttings should be gradually exposed to outside conditions, which are very different from those conditions found inside the plastic tent. If a cutting, rooted under conditions of high temperature and humidity, is potted and placed on an open greenhouse bench it promptly wilts.
Once potted, cover cuttings tightly with a sheet of plastic, shade, and remove plastic gradually over three to 10 days. Do the same with cuttings rooted directly in the ground, where the plastic can be removed gradually from the wireframe itself.
For Hardwood Cuttings
Hardwood cuttings are handled similarly except for the time of year they are taken. The time to take hardwood, or semi-hardwood, cuttings is from the middle of August through the middle of March, though we are concerned mostly with the period from August through October. During this period they are easier to handle and require less attention than softwood cuttings taken in the summer months.
Follow the same rules for ventilation. Water the medium even less often (every four to six weeks), since temperatures outside the plastic are are considerably cooler and the medium dries out slower. When taken in the fall, cuttings require no additional shading such as softwood cuttings during summer.
To control diseases, employ the same practices recommended for softwood cuttings, though in cloudy weather they should be sprayed twice a week. Once rooted, remove the plastic cover all at once, since the material is dormant. Then mulch for winter protection, and unless the cuttings dry out, they should come through the winter successfully.
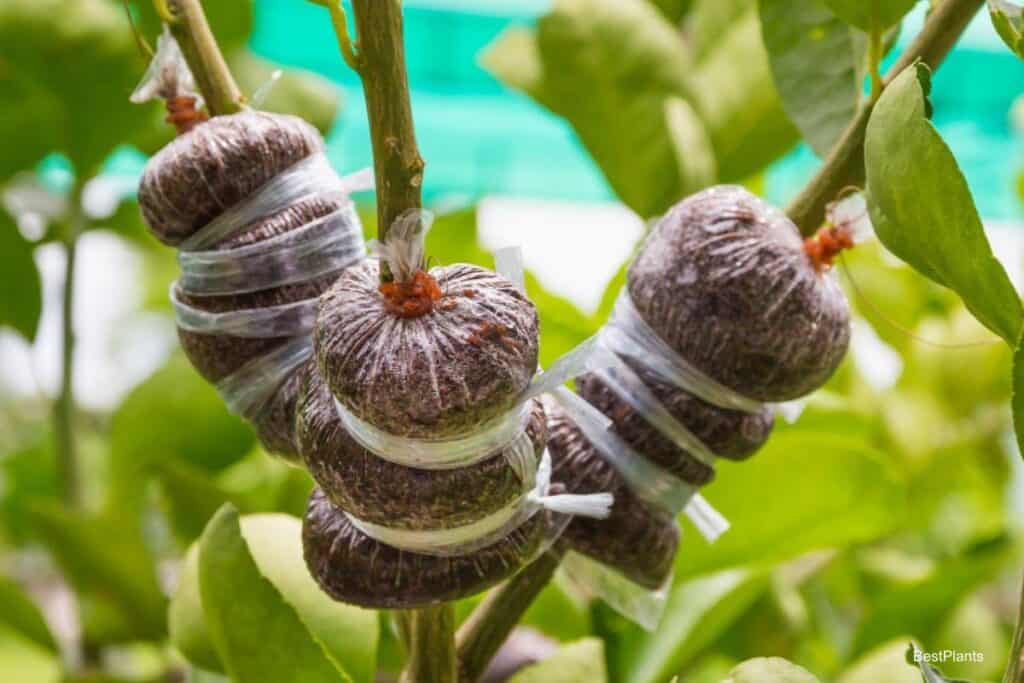
Air Layering In Backyards
Thanks to polyethylene plastic, home gardeners can practice Chinese air layering in their backyards. Best success is achieved when the layers are put on just as the buds break their dormancy in the spring. The following is the procedure to follow.
First, run the moss through a one-half-inch screen to make it finer. Moisten it with water, though no free water should be squeezed from it.
Once the moss becomes soggy, either because it was too wet when first applied or because rainwater has run down the stem of the plant into the layer, due to improper sealing, fermentation will take place and there will be no rooting.
To air layer a favorite plant, select a stem of the past season’s growth and wound it by cutting downward or upward, either way, approximately one and one half to two inches in length and one-third of the way through the stem.
Remove the flap of bark made by the cut, otherwise, when the moss is pressed around the wound, it will close again and rapidly heal. Dust the cut with Hormodin #3 with a small sash brush to stimulate rooting.
Roll the prepared moss into a ball, cut it in halves and press the two pieces around the wounded area. Then wrap a six by six-inch sheet of plastic, previously cut, tightly around the ball of moss. Seal the plastic at both the top and bottom with strips of black Scotch Electrical Tape #33.
These strips are cut long enough so they will seal the ends of the plastic and stick to the stem of the plant, making a tight seal that will exclude excess rainwater. Once rooted, sever from the parent plant, remove plastic and plant layers directly into prepared beds.
Mist Spraying
Mist spraying systems are new in the field of propagation. Like polyethylene plastic, they maintain high relative humidity around cuttings. In mist spraying, a series of nozzles are spaced along a pipe, which in turn is supported over the cuttings.
These nozzles give off a very fine mist, thus maintaining humidity and preventing wilting. This type of system can be used inside a greenhouse, where the cuttings are rooted directly in benches, or out of doors during the summer months when cuttings are rooted directly in the ground.
Several devices are used to control the amount of mist. The first is the manual method of an experienced person who applies the mist continuously for several hours during the day, depending on weather conditions.
Use a Time Clock
The second is a time clock, set so that the mist operates any desired number of seconds out of sixty. This is still governed, however, by the operator who, through experience, knows how many seconds out of a minute to run the mist, depending on the weather.
The third and most recent device is the “electronic leaf”, which turns the mist on and off automatically. It consists of two carbon contact points, embedded in a small block of plastic. This plastic, which is on a short stand, is inserted into the medium with the cuttings.
As the surface of the leaves dries off; so does the surface of the plastic, though it dries off slightly faster. When there is no longer a film of water covering the plastic, the contact is broken and the mist turns on.
It is easy to see, therefore, that with the advent of polyethylene plastic and the constant or interrupted mist systems, plant propagation for the home gardener is more possible than ever before.
44659 by Roger G. Coggeshall