Peonies are a sedative to the tired mind and weary body. To produce them requires no engraved parchments designating degrees in entomology, plant pathology, political chaos, or any other department of science, as the noble peony bathes few hugs or ailments.
Only elementary knowledge is necessary, such as being competent to distinguish a hoe from a horse.
Assuming that a “majority of readers” are qualified to pass that test, concentration will be focused on the simple elements that are the basis of the miracle of producing prizewinning honors.
It was discovered many centuries ago and has since become traditional that it is necessary to have a hole in the earth if one wishes to bury the ungainly root of a peony.
It was amazing how the idea spread also how unpopular it became.
Regardless of public opinion, I place myself on record as a disbeliever of the theory that a hole big enough to bury a piano is necessary to plant a peony root only big enough to cover the outstretched hand.
And it’s fitting to remark that the smaller the band size, the better the root size.
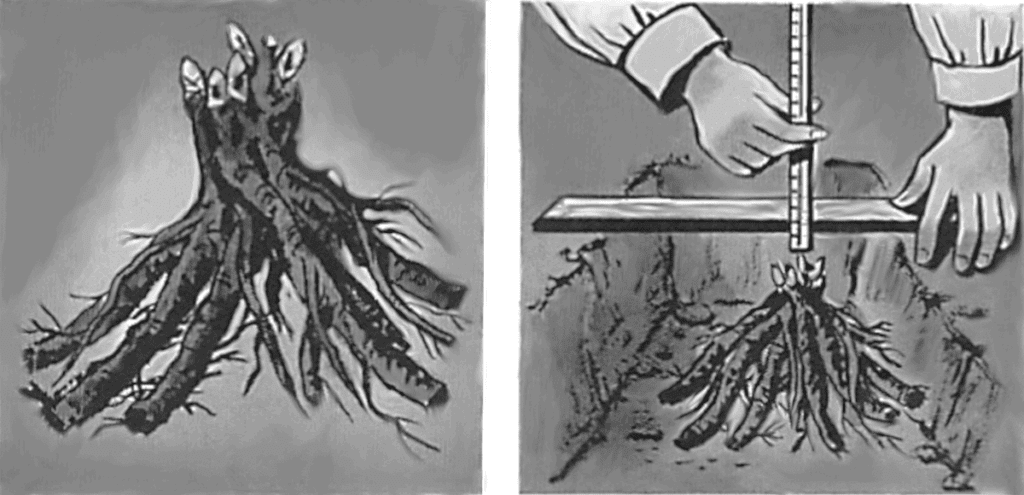
I have arrived at the flawless conclusion that you should never dig a hole 2’ feet deep when the bottom level of a properly prepared root division is rarely more than 8” inches in depth.
The logic supporting this conclusion is that a too deep hole will eventually cause the earth to settle and thus drop the eyes of the peony root more than 2” inches below ground level. The eyes should not be below this depth.
If the hole is dug somewhat deeper s than necessary, some of the earth cans are replaced and pounded down solidly with the fist until the roots rest firmly on the compacted base.
The eyes should be adjusted to the proper depth, 2” inches below grade level. The hole is then half-filled with soil and water added.
After the water has soaked in, the balance of the hole is filled. A full shovelful of loose earth is added to the top and gently firmed with hand pressure.
Settling loose earth around the root will eventually absorb this surplus mound of earth.
So, up to this point, we’ve proudly planted a root! But what kind of a root?
Is it a slip spayed off the side of a plant in the garden of a generous friend who has ruthlessly injured a good plant with good intentions?
If you ever receive such a slip, my advice is to thank your friend and sneak home and cremate it, but for goodness sake, don’t plant it!
Its valiant battle against insurmountable odds will be too great, and your anticipations and efforts are almost certain to be unrewarded.
Confine your acquisitions to good varieties from dependable nurserymen who specialize in selling young, vigorous root divisions.
Planting Preparation
Don’t assume that divisions from all commercial growers are ready to plant. You have a job to do!
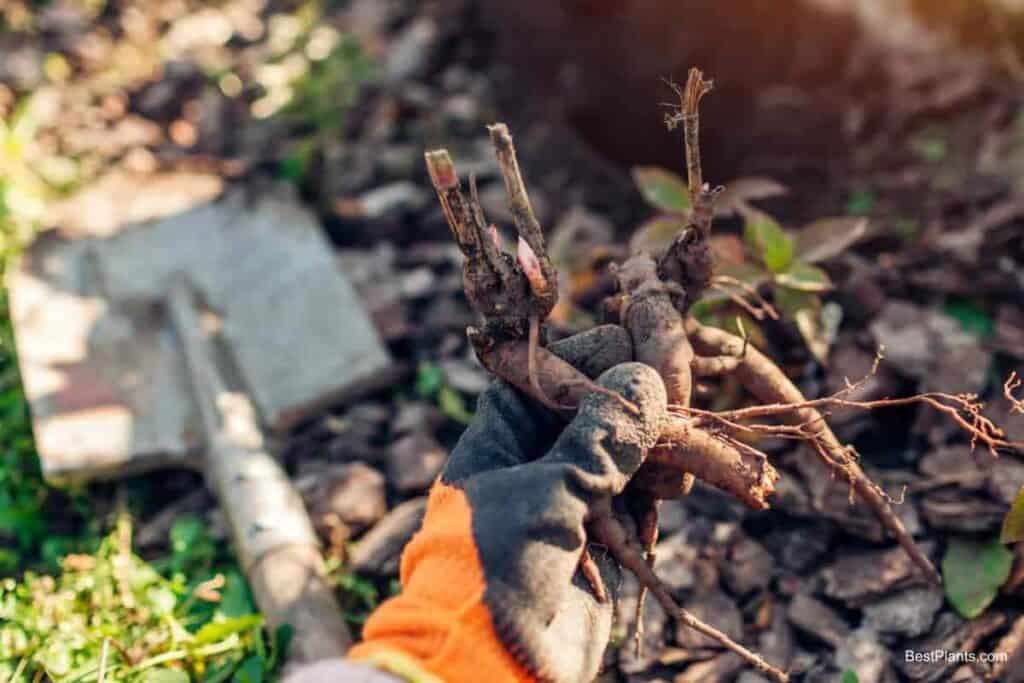
Examine the roots; if any fibrous roots are present, remove them, leaving the trunk roots as clean as a sweet potato.
Use a small, sharp blade—not a spade—and remove deformed and superfluous lateral roots that would develop and expand.
Eventually, crowding the trunk roots and choking off the food supply. A star-shaped root pattern is ideal.
Trim all roots extending beyond your outstretched hand’s limits, making a sloping cut similar to the type used in tree surgery.
This type of cut calluses nicely and prevents the growth of a “witch’s broom” extension of new roots.
This surgical performance depends on the difference between inferior and superior plants and flowers.
After trimming and shaping the roots, soak them in water for a few hours before planting.
Overnight soaking is all right. too, as they will only absorb a limited amount of water.
If planting a sufficient number to make the trouble worth your while, go to your seedsman and purchase a can of Samasa-bel and give them a 15-minute dip.
Aside from the precautionary benefits of its fungicidal purpose. This chemical seems to add vigor to the plant.
I have used it on some expensive but anemic roots that came up well and grew into fine plants.
Plant roots in early September for best results. Then they will have time to establish feeding roots before the ground freezes.
Claims are made that properly stored roots can be planted in the spring. To this, I can only say, “Travel at your own risk.”
After planting has been completed, drive an 18-inch stake into the ground with its base at the outer edge of the filled-in hole and the upper end directly over the tile crown and a foot or so above it
This will guard cats, dogs, and clumsy friends from tramping on the tender young shoots and ruining the plant.
Cover with mulch the first winter to prevent spring heaving. Branches from your discarded Christmas tree make a splendid covering.
These should be put on after the ground has frozen. When you remove the branches in spring, do not remove the mound of surplus earth.
Let spring rain and settling take care of that. To have good, strong, sturdy plants, don’t baby them.
Old Mother Nature looks after her kids and prefers them to fight so they will become tough and sturdy.
Peonies prefer average garden soil, not too rich. They like a clay subsoil for it gives the roots firm anchorage; a loose, sandy soil is not at all to their liking.
Give young plants a good soaking during the hot, dry weather, especially in the first season.
And do not fertilize! Normally they have no need for added food for at least five years after planting.
After that, a handful of bonemeal in the spring and an equal amount of wood ashes in tile fall is sufficient. Compost, if available, is the ideal food.
Add a hit of agricultural limestone to the compost. This combination makes a splendid diet. Better too little food than too much, as they are susceptible to “indigestion” if overfed.
Occasional shallow hoeing to form a dust mulch is all that is necessary. This mulch insulates the soil surface, keeping the roots cool and moist.
The compact and bushy foliage of mature plants shades the crown and shallow upper roots.
It pays to devote a bit of time to cultivation, for next year’s results reflect this year’s care.
Transplanting Tips
The curse of peony growing is transplanting plants after they are once established. In a well-planned garden, this does not happen.
However, if a plant must be relocated, start at the beginning and redivide and retrim. No expert has yet to transplant an entire clump, regardless of size or season.
Yes, it will grow, but you are destined to always have a sulky plant with mediocre flowers.
Some wiseacre will be happy to refute that statement claiming that he had “done it hundreds of times,” but let his flowers be the proof! Use discretion in establishing a permanent location, keeping away from tree roots and the ever-expanding growth of shrubbery.
If properly located and undisturbed, your plants will reward you with 15 years or more of super service.
Do not attempt to redivide old worn-out plants; junk them as you would an old car and purchase the new stock of vigorous two- to three-year-old plants propagated for this purpose.
Seeing plants squeezed into a location unsuitable for healthy growth and development is pitiful. They must have room to form a pattern.
An area of 3 1/2 feet should be allotted to give each plant the privilege of displaying its full charm.
Like trees and shrubs, peonies are affected by crowding, becoming in its shape “leggy” and tin-attractive. Restrict the number of plants, but never their space.
For landscape material, peony is an ideal medium. Low plants, such as Mrs. C. S. Minot, tall plants with the stature of Cherry Hill, and plants of average size enable the designer to select adaptable specimens for specific usage and compositional effects.
If judicious selection is made to extend the blooming period, it will range over several weeks or more.
Each variety has a fixed habit of blooming—from a very early to a very late period—and familiarity with this habit is a valuable asset in plant assembly.
Cutting Flowers
Buds cut late in the evening when about three-fourths open is best for interior table use.
Put the stems in water immediately after cutting and store them in a cool basement overnight.
A few hours after they are brought into light and warmth, you will feel the urge to rouse all the neighborhood to bear witness to your ability to produce a product of supernatural beauty.
If you’ve planted a root carefully and a small puny plant with one to three stalks appears the following spring, don’t be impatient. You’re in for a big surprise!
That timid little “fellow” is building a sturdy foundation under his abode.
When the third year arrives, you’ll be amazed at the blooms that will make you strut your stuff for your neighbors. If you lack patience, plant potatoes!
Four Peony Types
Almost 11 of our garden peonies are of Chinese origin, known botanically as the Chinensis species.
In its original form, this species was a true single. It is also known as albiflora and sinensis.
Through the work of hybridists, three other types have been developed, making four distinct types in all, namely:
- Singles
- Japanese
- Semi doubles
- Doubles
There is confusion in the minds of some laymen as to the interpretation of the world’s type and variety.
Type represents a specific form, while variety is given to any plant to identify it from another. There are only four peony types but hundreds of varieties.
The word form is often used as a descriptive feature common to certain varieties, such as rose-form, etc., but this term has no allusion to type.
The following is a descriptive outline of the four types:
The single type has one row of petals known as guard petals. In the center of the flower is a yellow cushion of stamens, and in the center of this cushion is a starfish-shaped group of carpels (pistils) which eventually become the seed pod.
The tip of the carpel is the stigma.
Japanese Peonies
Japanese peonies are quite similar to the singles, except that the cushion is generally heavier due to the transformation of the stamen into staminodes.
Staminodes are expanded stamens without anthers (pollen sacs). therefore. no pollen is evident.
This is a determining factor in identification when a similarity exists between the Japanese and single types.
The lack of pollen sometimes makes the Japanese types preferable, as pollen on the petals detracts from their appearance.
The pollen is also highly acidic, and rain will cause it to blacken the petals.
There is a pronounced difference in the size and pattern of the staminodes, varying from threadlike filaments up to petalous. Wide varieties also have distinct crinkly foliage.
Semi-Double Kinds
Next comes the semi doubles, wherein the stamens, if male, and the carpels, if female or bisexual, are partly transformed into petalous or full petals.
The transition is only partial as all semidoubles retain a portion of the sex parts.
Some of the many patterns have very compact petals and can only be distinguished from the full double by the stamens interspersed among the petals.
Compact varieties with the stamens so deeply embedded in the petals as invisible are often classed as doubles.
The petals are generally loose and open, and due to their informal appearance, the semi-double is favored for artistic effects.
The double-type peony is a flower devoid of sex elements—all these parts have reached full petal development.
Vivid red markings on the center petals of many varieties of both semi-double and double types result from the transition of the carpel into a petal, with fragments of the red stigma being retained.
Considerable interest is being directed to varieties with a normal habit of producing smaller than average flowers.
This class, known as decorative, is not to be regarded as a type as it represents flowers assembled from various types.
Therefore, it is a class and not a type. Their size, form, and colorfulness are attractive in arrangements with or without other flowers.
42969 by Roy Gayle