The gardener who burns all his leaves, grass clippings, weeds, and small prunings is destroying valuable soil material.
Material that would have added fertilizer to the soil and improved the structure. Material that would have aerated a heavy clay soil or helped a too-sandy soil to retain much-needed moisture.

Do you think of soil as being something inactive and lifeless? Poor soil may be near death, but good soil is teeming with untold numbers of active and very much alive microorganisms.
Soils, like plants, should be treated as living things. There is a close relationship between the amount of life in the soil and its fertility on which productivity depends.
Forests continue to thrive for ages because each year, the refuse that falls and collects is left to decay and enrich the soil gradually.
We make use of this same principle by making compost from our waste materials and applying it to our gardens each year.
The waste materials are converted into a rich, dark, crumbly substance that can give new life to worn-out soils. Even good soils need renewing.
There are dozens of ways of composting these waste materials. Some are simple to follow, and others are quite lengthy and complex. Busy gardeners prefer simpler methods.
Methods For Composting
Two of the easiest methods could not rightly be termed making compost. But both are much better than burning or destroying this valuable material or hauling it away.
The first is nature’s way—letting the leaves fall between the shrubs and perennials and carrying those that fall on the lawn, paths, or where they cannot be left to places where the soil needs enriching.
This could include grass clippings and weeds. We would be mulching instead of corn-posting, but this material would, in time, be worked through by insects and bacteria and, with the help of rain, is turned into soil enrichment.
The second method is to throw everything of this nature into a pile —grass clippings, leaves, weeds, small prunings, vegetable peelings, and the like as it accumulates.
Decay would be slow but could be hastened by sprinkling on soil occasionally and occasionally turning the material occasionally.
Less Haphazard Methods
But if one has the time and strength, better results will be obtained with less haphazard methods. Please choose a location for the compost pile near a water supply where it can be screened from view as much as possible. Protect it with a hedge, trellis, or wall on three sides.
The site should be well-drained—not near the bottom of a slope where water might collect during prolonged rainfall.
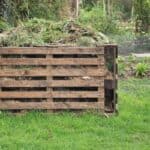
Bins or fenced enclosures may be constructed into which the material is placed. For convenience, arrange one side so it can be opened to turn the heaps and get at the finished material.
Snow fencing may be used. Four posts are sunk into the ground at each corner. Other suggestions are cement blocks or bricks laid to permit air to enter; chicken wire with posts to make a square, rectangular or round container; rough stone where it is available. Or logs make enclosures that are in the right place in an inconspicuous spot in the garden.
Adding Soil To Compost
When it is necessary to add soil to the layers, a pit or hole may be dug in a well-drained location. This part of the heap is lower than the soil surface. The soil that is dug out can then be used in constructing the compost pile.
The size of the heap will depend on the available space and the amount of material at hand. It should be no smaller than 5’ feet square but larger. 5’ feet high is about the maximum regardless of width and length for best results.
If there is space, it is a good idea to have at least two piles. One ready to use and the other in the process of decay. There should be space, too, next to where the heaps are to be made to pile the green materials as they accumulate.
These should wither some before being used, and there should be enough on hand to build the heap at once.
Using Green Materials
Green materials are meant for plant refuse —weeds, grass clippings, discarded vegetables of vegetable waste from the kitchen, dead foliage, hay, straw, corn stalks—just about any vegetable matter that will decay. The word green, as used here, does not refer to color.
If the soil is hard where the heap is to be made, spade it first so there will be good drainage. Place a layer of green material six to 10” inches high on the ground. The looser this material is, the thicker the layer can be.
If compost is on hand, sprinkle a thin layer of this on the green layer. It will contain the soil organisms that help to tear down the composting materials. If the finished compost is sifted, coarse siftings may be used.
Adding Fertilizer
Add a layer of fertilizer and a sprinkling of agricultural lime or wood ashes. Then a layer of soil is enough to make about 2” inches of the materials above the green layer.
If everything is very dry, water each layer as the heap is built. The bacteria that do the work require ample moisture. But they require air also—the heap should not be waterlogged. It should be soft and fluffy but should have all the moisture it can hold without any of it running out of the bottom of the heap.
Add another layer of green material and another layer of fertilizer, soil, lime, and compost if any of the latter is at hand.
Alternate the layers to make the desired height, sloping the sides gradually to make the heap somewhat smaller at the top than at the bottom. Leave a depression at the top to hold water when it rains.
If the heap drying out between showers is dangerous, the hose can be used. The top and sides could be covered with a 6” inch of straw mulch to prevent the heap from drying during hot, dry, windy weather.
Decomposition Process
Decomposition is hastened if the pile is turned in three weeks—forked over so that the material on the outside of the pile is toward the center and gets the benefit of the heating and decaying action which is stronger in the center. In turning the heap, the layers are disarranged, which is quite all right.
In five weeks, another turning will be beneficial. Such a pile should be decayed in three to five months and be ready to use. No harm will be done if weather or individual conditions do not permit turning when the exact date arrives.
Matter Of Timing
We find that authorities differ greatly in the matter of timing. Some say to turn the pile every two months except during the winter. Others recommend one turning at the end of three months. A gardener must, through experience, find out which method works best for him.
The high heat generated in the fermenting process usually kills any weed seeds. There should be no disagreeable odor. If there is, it means that the wrong kind of decomposition occurs. Forking it over and adding agricultural lime usually corrects this.
A heap that does not have enough nitrogen will decay very slowly. Adding fertilizer, rich soil, or compost will quicken the decaying process. A heap that is too soggy will smother the air-loving organisms, yet if it is too dry, these organisms cannot work.
Holes can be made in a pile to permit air to enter. A black plastic sheet helps keep the heap from drying out too rapidly or from getting too wet during rainy weather.
Shredding Or Grinding
Shredding or grinding the green materials shortens the process of turning the heap into rich, crumbly dark humus. Material such as corn stalks should be broken up or shredded but even leaves decay faster if shredded.
As the heap heats up, it starts shrinking in size. The heaps are made in layers so that the ingredients are used in fairly correct proportions and mixed evenly throughout the heap.
44659 by Olga Rolf Tiemann