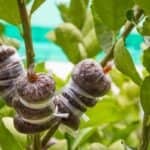
Air layering plants is an ancient method of plant propagation. Also called air grafting, many believe it originated with Asian gardeners. The technique allows gardeners to increase hard-to-get plants or those with sentimental value.

The How To Of Air Layering Propagation Step by Step:
1. Select a branch from 1/4″ to 1 1/2″ inches in diameter.
2. Remove a ring of bark just below a node or joint. This ring should be about the same width as the diameter of the branch. Scrape the wood clean.
3. While the wood is still damp, dust the cut lightly with a rooting hormone powder. This can be applied with a small paintbrush. Rooting may take place without the hormones but will be slower.
4. Next, moisten a large handful of spaghnum moss. Squeeze out all the water possible, so the moss is just damp. Place this moss in a ball around the cut so the cut is covered evenly. The larger the branch, the larger the ball of moss necessary to allow for root growth.
5. Place a sheet of polyethylene plastic over and around the ball of moss, and then secure it to the stern above and below the ball of moss with a tape-tie or other covered wire. Any overlapping of the plastic should be turned toward the bottom so it will not collect water and saturate the moss.
6. With many shrubs, roots can be seen in three to eight weeks. Other species may take much longer.
7. Do not disturb the air layer but when six or seven good-sized roots can be seen, cut the whole branch off just below the plastic. Remove the plastic carefully, keeping the moss on the unit. Plant the entire thing if the component is small; plant it in a pot; if it is large, plant it in a shady location.
8. Trim off about half the foliage to reduce evaporation and not let the new plant dry out.
As a rule, shrubs root faster in spring, but most can also be rooted successfully any time during the summer. If there aren’t enough roots by full, leave the ball on till spring.
Kits for air layering plants are available online or at local garden centers.
41320 by Jay Seeley
