
To me, primroses are the real aristocrats of those plants that bloom in the earliest spring. They are wonderful when massed in a bed or border.
Even when just one or two plants are grown in the shaded rock garden, nestled among other greenery, they will provide a lovely spot of color.
Probably the reason more primroses are not grown is because of the false notion that they are difficult, or that they are not winter hardy, or that one does not have a suitable location in which to grow them.
Today, so many species and choice hybrids are on the market that they can be made adaptable to almost every situation, be it sunny or shady.
However, most primroses are at their best in a north or east exposure. Primroses are winter-hardy even here in Minnesota, where the temperatures may reach 20° to 30° degrees Fahrenheit below zero during our coldest weather.
Growing Primroses
For many years, I grew primroses in a well-prepared border north of the house. When I wanted more room for primroses, I ventured to experiment by planting a whole bed of them on the cast side of the house.
I have been amazed that they have never seemed to resent even the full sunshine of the late morning when the temperature gets quite high before the house begins to shade them for the rest of the day. Of course, I see to it that they never lack moisture—the hose is close at hand.
I use its flared nozzle to spray them with water several times a day during the hottest weather. The humus in which they grow, deep compost, and leaf mold worked into the bed, helping to keep the roots moist and cool.
Some species are difficult in certain locations, but several species and dozens of glorious hybrids are considered easy to grow, provided their simple cultural demands are met.
There are several primrose specialists in this country, and their catalogs brim over with helpful cultural advice.
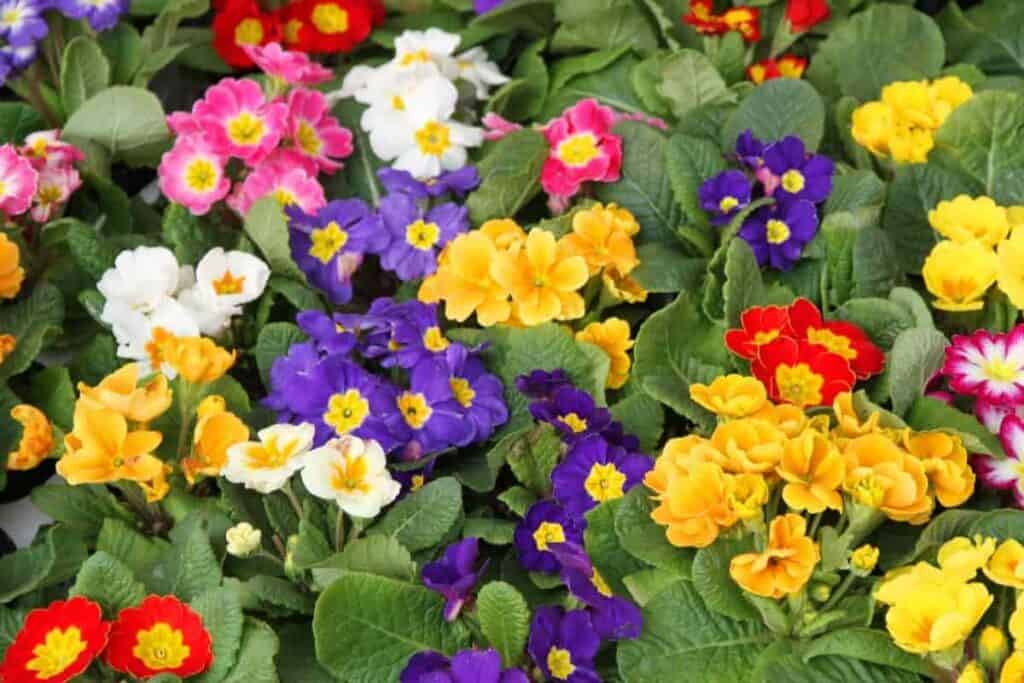
Polyanthus Primroses
The polyanthus primroses, easy to propagate, either by seed or division, are indescribably beautiful. The umbels of flowers come in shades and combinations of gold, white, red, pink, lavender, canary yellow, peach, salmon, rose, blue, henna, burgundy, fuchsia, and violet.
The flowers are often the size of a 50-cent piece; Barn-haven, a leading grower, offers a series of polyanthus primroses with blooms the size of a silver dollar.
Primula Rosea
Primula rosea is one of the earliest pink-flowering primroses. P. japonica is the classical candelabra type of primrose. It comes in several colors and is delicately fragrant, easy to grow, and prefers less sun than most. P. sieboldi is a hardy native of Japan.
It has fringed flowers and crumply foliage with a dainty appearance. P. denticulata blooms so early that a fat flower bud shows even before the leaves appear.
Primula veris is the wild cowslip with small yellow-orange flowers on a six- to ten-inch stem. The yellow oxlip, P. elatior, is also a wild form.
Primroses Propagation
Primroses may be propagated by division or from seeds. The division is done after blooming and early enough so the new plants will be rooted and established before the ground freezes.
Here we prefer to do this in August. The plants of some varieties grow into such tight, compact clumps it is necessary to chop them apart.
Before planting or re-planting primrose, the soil should be enriched with compost and leaf mold.
If possible, this should be spayed in and mixed well with the top 12″ inches of soil, along with some peat moss and old manure.
Winter Mulching Of Primroses Is Important
The mulching material is not applied until the soil has frozen. This is because the purpose of mulching is to keep the ground uniformly cold rather than to keep it warm.
If the plants were not mulched, then the soil would freeze and thaw alternately, thus breaking off the primrose roots.
Small evergreen branches, or something coarse that will permit some air to remain around the plants, are advisable for the first mulch layer.
After this material is placed, then it is possible to put hay or leaves over the primroses without smothering them.
Here we remove the covering gradually during the last part of March so that the plants can adjust to the sun and spring winds.
Primrose specialists offer starter plants, usually for late summer or early fall delivery. They are sent so you will have time to establish the young plants before freezing weather.
These seedlings will produce outstanding results. If they are planted in woodsy, humusy, moist soil, they should multiply and become showier and shower each year.
How To Grow Primroses From Seeds
It is an exciting and gratifying experience to grow primroses from seeds. They may be planted almost any time of the year, depending on one’s facilities for caring for the seedlings. A soil mixture of loam, leaf mold, and sand is suitable for the seeds.
If this is put through a quarter-inch screen, the coarse part may be put in the bottom of the flat or pot for drainage. I prefer to add a fourth inch of milled sphagnum over the top of the soil for a sterile planting surface.
The seeds are small, and if they are covered with anything, they should be a scant sifting of sphagnum.
The soil and moss should be well moistened and drained before sowing the seeds, and once they have been planted, they should not be allowed to dry out at any time.
It is a good idea to cover the flat or pot with a screen so that the container can be placed outdoors for alternate freezing and thawing—necessary to get good germination of most kinds of primula seeds.
A coarse burlap covering will help to keep heavy rains from washing the seedbed. When spring comes, examine the flat often, and when the seedlings appear, remove the burlap and keep them moist in a cool, sheltered place.
Transplanting Seeds
Plants can be transplanted to a larger container as soon as they are large enough to handle with ease. The roots will be surprisingly long and numerous.
It is a good idea to transplant the seedlings into 2 1/2-inch pots for growing on. Transplanting them into peat pots is also practical.
If it is not convenient to sow the seeds when and where outdoor freezing is possible, artificial freezing will hasten germination.
First, put a little water in the seed packet, then place the packet of moistened seeds in the freezer for a few days. Thaw for a day, freeze again for two days, then plant as soon as they have thawed.
44659 by Florence Knock