
Even though fall is months away, it’s not too soon to start working for top-quality chrysanthemums to brighten up borders or foundation plantings.
Chasing Perfection
Regardless of the number of plants grown, or whether the grower is a mum specialist or not, the aim should be for the best flowers possible. Quality blooms are more appealing in the home garden and a must for the horticultural sections of the shows.
Arrangers, too, are beginning to appreciate the opportunities offered by the variety of forms and colors of well-grown chrysanthemums.
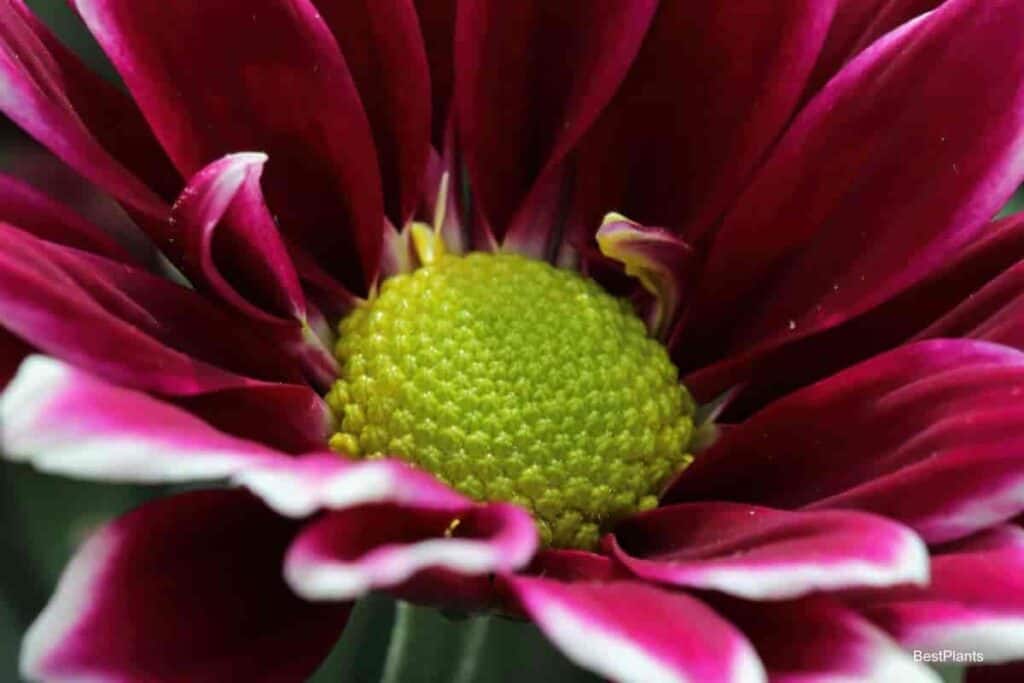
Some chrysanthemums must be of top quality to look like anything at all—spiders, spoons, anemones, and incurves, especially. A lopsided bloom of any sort would hardly be admired. Odd-flowered varieties make gorgeous corsages, but they must be large and well-grown for best effect.
Perfection will never be attained; the gardener may never be satisfied with his results when attempting to reach perfection, but he will get some dandy mums if he keeps trying to get better flowers each year.
Steps To Getting The Best ‘Mums
Getting the most out of your mums is not difficult. The first step is to select the right varieties. Many varieties never give a really good bloom no matter how carefully they are grown.
The best varieties may be found listed among the 100 Favorites assembled each year by the National Chrysanthemum Society in its poll of members. You can count on these varieties to respond to the decent culture provided to them.
The second step is to grow no more than the number of plants that can be taken care of properly. If this means growing only one variety or only one plant, then do just that. Making a plan with a reasonable chance of fulfillment is always good judgment.
The third step is to have some knowledge of what is needed to grow quality blooms. The belief that a great fund of information is essential is easily disproved by the success that first-time exhibitors sometimes have. It is said that if you can grow good vegetables, you can grow good mums.
Lastly, and most important, is the matter of doing the essential jobs at the right time. There are no secrets to successful chrysanthemum growing; all the information needed is available in publications.
However, each gardener may have their own pet methods based on their reading and observations and confirmed by experience.
Obtaining Good Stock
If you’re just starting out, be sure to get good stock. If your nurseryman sends you poor plants, write him, complain about it and return them.
New diseases have appeared in mums recently, and the commercial man can’t tell how his plants behave unless you cooperate by telling him.
You may be able to obtain clean stock from an amateur specialist in your neighborhood and perhaps be more sure of results.
In any case, rogue diseased or weak plants at once. Don’t wait for them to recover, for they won’t – not from verticillium wilt or stunt disease, which are the worst, nor from most other diseases.
Preparing The Soil
The soil should be prepared and “seasoned” before cuttings or plants are ready to be set out. Each gardener has their own method of soil preparation. We use 40 pounds of dry cow or sheep manure, 4 pounds of 5-10-5 fertilizer, and 2 pounds dolomite (limestone with magnesium) per 100 square feet broadcasted before digging.
We used to follow the rule of going deep enough to bring up a trace of subsoil, but now, after more than 15 years of gardening, our foot-long spading shovel is too short to reach it.
If the plants are to be potted, the potting soil should be a fibrous mixture containing a little fertilizer. We have found that two parts each of garden soil and compost, one each of dry cow or sheep manure and peat moss, and one-half to one part of sharp builders’ sand with a 2 1/2″ inch potful of 5-10-5 fertilizer and a 2″ inch potful of ground dolomite per bushel does very nicely.
Chrysanthemums will tolerate many soil mixtures. Soils differ a great deal in different localities, yet chrysanthemums are grown successfully all over.
Elmer Smith, dean of chrysanthemum growers in this country, once said that they must all be good since the results were good. The big shows demonstrate this since no two soils are exactly alike.
Proper Spacing
Large specimen plants must be spaced to have sufficient room to permit light and air on all sides down to the ground. This may mean 3’ or 4′ feet between the plants.
Plants grown for cut blooms may be set much closer since they will be grown to a single stem or, at most, to not more than three stems. But, to obtain the highest bloom quality even here, the spacing will be greater than the commercial grower could afford.
Space your plants not less than 10″ inches apart in each direction, and, of course, only a single bloom or spray will be allowed to develop on each plant.
Yes, suitable results may be obtained from two or more branches, but – other things being equal – the fellow who allows only one will get the blue ribbon at the show.
Providing Adequate Support
Quality blooms are carried on straight stems, and straight stems depend upon adequate supports set in place before curves develop. Heavy wire or bamboo is satisfactory.
Slender bamboo stakes are acceptable in pots indoors, but for outdoor work, they should be from 1/2” to 3/4″ inches thick. We use a thin, soft spun-cotton cord for tying. It darkens and does not show as the season progresses. Ties should be less than 10″ inches apart.
Watering
Chrysanthemums can be overwatered, but damage from watering usually comes from inadequate sprinkling – putting on just enough water to wet the foliage and the surface of the ground.
This type of watering is also just enough to start the growth of spores of disease-producing fungi. It can even bring mum rootlets carrying the root hairs to the surface where they will dry out.
When this occurs, the plants are really deprived of water. If the plants need water, put it into the ground, not on the foliage, and put enough onto wet the soil to a depth of 6” or 8” inches. Then you will not need to water so often.
Fertilizer
The fertilizer recommended in preparing the soil will carry the plant through the season with attractive blooms. But these blooms will not win the blue ribbons when in competition with blooms from plants that have been fed.
Quality results may be had either with liquid manure of the usual weak tea strength or with a soluble 5-10-5 fertilizer at about one rounded – not heaped – tablespoonful per gallon.
Start about a month after plants are set out and repeat every 10 days to 2 weeks until color shows in the buds. One good way not to lose track is to do it on the 1st and 15th of each month.
Too much fertilizer given too early may prevent the formation of flower buds; given too late in the season, it may cause soft bloom, molding of the petals due to fungus attack, and wilting after cutting.
Deadheading Methods
To prevent loss of bloom by botrytis disease, cut faded blooms before they shatter and gather the petals that may have fallen on the soil. If left, they will become the source of new infections.
There are so many different pinching systems that a full discussion of all would be impossible at this time. “Timed pinching” is the method used to determine the date that a flower bud is set. Some of the largest blooms, notably most of the Pockett cultivars, should have a bud set about August 15.
To get this, a pinch around June 25 is needed. Only one of the several leaf buds resulting from the pinch is permitted to remain if one is growing to a single bloom. Therefore, the first bud to form after the pinch will be the one to keep.
With most other varieties, the first bud to form after August 24 will give a good bloom; a pinch in mid-July will usually give a flower bud at this time.
The plants may be allowed to form flower buds naturally by another system. All which form before August 25 are removed. Branches will start below the bud, and all but one of these should be removed. The one that is left is reserved as the leader. The first bud that forms after August 25 is retained for large blooms.
All crown buds should be removed when trying for a flower spray, and a “terminal cluster” awaited. A terminal cluster is a group of flower buds, not leaf buds. The crown bud will be surrounded by leaf or branch buds, so it could not give a good spray.
However, the terminal bud will give a spray with nicely spaced blooms at the branch’s end.
When one is trying for large blooms, the procedure with a terminal cluster is to remove all the buds except the largest, usually the one in the center.
Sprays And Disbuds
It is often said that anyone can grow a spray. This is true enough, but these sprays usually look as if anyone had. Sprays have as much appeal as large blooms to those who do not measure their beauty with a foot rule. Moreover, they respond to careful culture as generously as do the large blooms.
All spider and quill mums should be grown as disbuds (i.e., a single flower per stem, after all side buds have been removed while the plant is young). When grown as sprays, the blooms become hopelessly entangled. The larger singles, anemones, and pompons are attractive either as separate blooms or as sprays.
The smaller ones are seen only in sprays. Large incurves and reflexes are usually disbudded, but many make very attractive sprays. It is usually more satisfactory to disbud the sprays to three blooms when grown as sprays.
Preventing Pests And Diseases
The good grower knows that the spores of leaf spot or rust fungi are usually present and start to grow within a very few hours when the foliage is wet. He sees to it that there is a coating of iron carbamate on the leaves before every rain.
If the weather is not too hot, sulfur may be added to the dust or spray. This is to prevent mildew. Sulfur also helps markedly in controlling rust and, to some extent, leaf spot.
He should also have insecticides on hand for each of the common insect pests: lindane, nicotine, or rotenone for aphids or thrips; DDT for tarnished plant bugs, caterpillars, and others; or parathion or neem as an all-pest spray. The proper one is applied at the very earliest appearance of each pest.
When disbudding has been completed, there is little else to do except, perhaps, some irrigating, fertilizing, tying, and an occasional bit of spraying or dusting, which must be finished, of course, before the blooms begin to open.
Additional Protective Measures
Some sort of protection over the plants may be erected as blooming time approaches. Blooms may be ruined by heavy rains, high winds, or frost. One night, even an hour, may destroy a season’s work – a loss that could have been prevented by forethought.
After blooming, the plants can be saved for propagation next year. Choose only the healthiest for stock plants. If you have a greenhouse (or the use of one), so much the better – keep your stock plants there over winter.
If not, put them in a cold frame. The cold frame permits strong early growth from which cuttings may be made.
Overwintering Care
Some gardeners ruin their stock plants in spite of the frame by not providing ventilation. Don’t suffocate them in a tightly closed box. As soon as the ground is firmly frozen and promises to remain so, mulch with salt hay, not leaves, then cover the frame with the glass sash, elevating the corners for air circulation.
Mulch the outside of the frame as well. Maintain this arrangement until growth can be expected to start and continue without any danger of the tender shoots being frozen. Now, in late March or early April, you will be concerned with your stock plants.
If watering is necessary, water with a watering can without the hose or with a water-wand to keep the foliage dry and so reduce infection from the soil-borne diseases. The winter mulch inside the frame helps to prevent rain from splashing on the foliage.
Lighten this mulch as the season progresses. As soon as the new growth starts, spray the stock plants with iron carbamate and sulfur and also with a good aphicide such as lindane or nicotine. Repeat often enough to protect new growth.
Cuttings
Cuttings should be taken about three weeks before they are wanted for planting. Plants for special purposes, such as cascades or specimen plants, must be started in January or early February.
If you are to plant out in mid-June, most cuttings should be started by May 20. This gives 10 to 14 days for rooting and the balance for growth in a pot or plant band.
Only tip cuttings should be used for propagation since both diseases and certain pests are sure to be carried along if root divisions are used. Take 2” to 3″ inch cuttings from the tips of the tallest and most vigorous shoots.
The accepted practice now is to break – not cut – the cuttings, thus avoiding any contamination carried from an infected plant on the knife.
The slips should be dusted with a hormone and insecticide or fungicide. Dipping them in a common bath is a sure way of passing along virus diseases such as stunt and yellows. The wholesale growers have practically eliminated stunt disease by use of these simple measures.
Rooting
The commonest and most satisfactory rooting medium is builders’ sand without added plant food. Remove the cuttings from the sand to soil when the roots are less than 1/2″ inch long. If the cuttings are left in the sand longer, feed them with a liquid fertilizer.
Use every precaution to promote growth and to provide freedom from diseases or pests. Vermiculite is a perfectly good rooting medium. It’s light to handle and free from diseases, but otherwise, we have found it no better than clean sand.
Pot the rooted cuttings in either 2″ inch plant bands or small pots. After ten days or so, they are ready for the open garden. Use the soil mixture already prescribed for potting but substitute 1/4 potful of potassium chloride per bushel instead of the 5-10-5 fertilizer.
Do not permit the plants to become root-bound and avoid hardening of the stems.
Timing
A number of factors determine the time of planting. First, there is the size of the plant desired at blooming time. January cuttings make large plants with many blooms: carry them along in pots, increasing size as needed.
June 1 is early enough to start the cuttings of most varieties when timed pinching is used. Plants that are to produce large blooms and sprays should be started about May 1, whenever the natural sequence of bud formation is followed.
The most essential element in growing quality mums is appropriately timing the necessary procedures. And remember, if you want quality blooms, don’t go in for quantity.