Seedtime is practically here. Soon you’ll have a spade, or rotary tiller in action to start the spring job of preparing seedbeds for your vegetables, flowers, or perhaps a new lawn.
Perfect Time For Digging
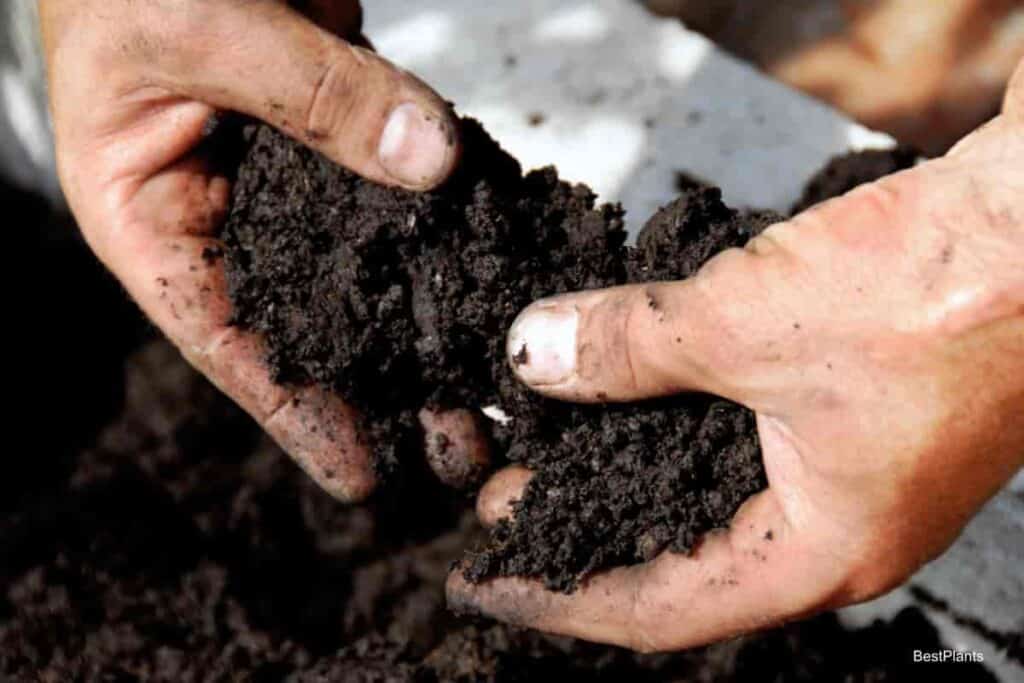
Be sure, first of all, that your timing is right. There is no better way to judge soil moisture than the wet ball test.
You take a handful of soil and squeeze it in your hand.
If it immediately forms a lump and water glistens at the surface, put your digging tools away and wait a few days for the soil to dry.
If the handful refuses to cling together in a tight ball, the soil is dry enough for tilling.
If you work the soil when it is too wet, you risk ruining it for a good part of the season.
It will form hard lumps that defy the rake to break them.
When you stir wet soil, you drive the air out of it, which explains why it becomes compacted, cloddy and dense.
If it keeps on raining, the best thing for you to do is wait.
Your soil drains well because it is sandy or humusy, or if it lies on a sunny slope, it will be ready sooner than the tight gumbo in a cool and maybe low part of your yard.
This spring, you can improve those problem spots by adding lots of humus (peat moss or compost), perlite or sand, and vermiculite for future years.
What To Do If It Keeps On Raining
If you have little opportunity to garden except on weekends, sooner or later, you may face the decision to plant in the mud or not at all.
If you choose to go ahead and plant, here are some practices that may save the soil and net good results.
For sowing seeds like those of zinnias and marigolds, do these steps:
- First, dig a 2″ or 3″ inch trench in the soil, treading as lightly and as little as possible.
- Fill the trench with vermiculite.
- Then plant seeds, covering them at the usual depth with vermiculite.
To transplant small seedlings, follow these steps:
- First, make a hole with your trowel.
- Then, fill it with about half full of sand.
- Next, put the seedling in place and gently add enough soil to level off the ground.
- Do not firm it in place with your hand as you would usually, but pour on enough water to settle the soil around the young plant’s roots.
Tools For Digging
Three methods of digging are open to you.
They are the following:
- hand spading
- rotary tilling
- plowing
Which you use depends on your tools and the space you need to dig up.
Save hand spading for the small areas—the flower beds and dooryard vegetable garden.
The rotary tiller will do an excellent job in a medium-size vegetable garden. It loosens the soil deep enough, even for crops like potatoes.
A tiller is also a superb tool for preparing a seedbed for a new lawn.
The moldboard plow, the time-honored way of turning the soil, is best adapted to large gardens because the pull-power is provided by a tractor that needs space to maneuver.
If you decide on hand spading, equip yourself with a clean, sharp spade. The long-handled kind is less tiring to use than the short-handled one.
Another tool for the same purpose, favored by some, is a spading fork. It is lighter than a spade and breaks the earth more.
To use either one in a hand digging project, stake out the area to be dug and start at one corner.
Push the spade in full depth with your foot, pull back the handle to loosen the bite of earth, lift it, turn the spade and let the soil fall back upside down in the same hole.
What was on top goes on the bottom. Move along one side of the plot to the end, then start the next row. You stand on the part still to be dug.
The Fine Art Of Double Digging
Double digging is a variation that goes two spade lengths deep.
To do this, do the following:
- Work across the narrow dimension of the bed. For instance, if it is 5 by 12 feet, go across the five-foot way.
- Dig out a trench two spade depths deep, load the soil in a wheelbarrow and dump it at the opposite end of the bed.
- Now, dig along the second row, throwing the soil out of it into the first trench.
- Keep on this way and when you get to the end, use the soil you dumped there to fill the final trench.
- When you go to this much trouble, it’s well to have rotted manure or compost on hand to add to the soil at the bottom of each trench. This improves the soil for years to come.
Rotary Tilling
If you decide on rotary tilling, you get advantages of comparative speed, and the soil will break up nicely without the need to rake it.
If your tiller is a kind with tines that follow (instead of precede) the wheels, there is no need to rake at all.
Tillers work best in soil free from stones and excessive surface growth.
They will mix in tree leaves and chopped vegetation well, but tall grass and weeds tend to wind up in the tines.
You can set most tillers to dig as deep as 6” to 8” inches, which is plenty for vegetables and flowers.
However, you may need to make more than one pass to reach this depth.
A Word About Plowing A Garden
If your place is big enough to permit plowing, you can quickly turn under large amounts of surface vegetation like sod, stubble, and cover crops.
This becomes humus before long, and plants thrive on it. A plow leaves the last furrow open.
If you start plowing at the center, this gap comes at the outside edge, which makes for better drainage than if it is down the middle.
If you plow your garden deeply each year, start one year in the center, the next on the outside.
Now is a good chance to add plant food to your soil.
Fertilizer tilled in is more effective than what you add later in surface treatments.
Spread a balanced commercial fertilizer (something like 8-8-8) at about a pound to every 100 square feet before you start digging.
Now Is A Good Time To Improve Your Soil
Now is also an excellent time to improve the physical structure of your soil.
For either an extremely sandy soil, or hard clay or gumbo, the best way to improve it is to add organic matter like compost or peat moss.
The more, the better—you can’t use too much. For lightening soil, a good additive is a vermiculite.
Before you plant the seeds, your spaded, tilled, or plowed ground needs to be worked down smooth and fine.
The rotary tiller performs this task so well there’s little more to do.
After hand spading, you smooth the ground by hand raking.
An ordinary bow rake is the best tool for this. Work it back and forth with a light touch until the soil is firm, level, and small particles.
After plowing, you smooth soil by going back with a disc or harrow, and probably a hand rake, before the ground is ready for seeds.