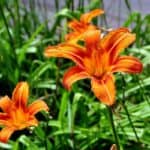
Early-day lilies stub their toes on the heels of lagging daffodils, and late ones stay around to rub elbows with fall asters and early mums.
In between, they hobnob with peonies, iris, Oriental poppies, and summer phlox. What other perennial varieties bloom over such a long period?
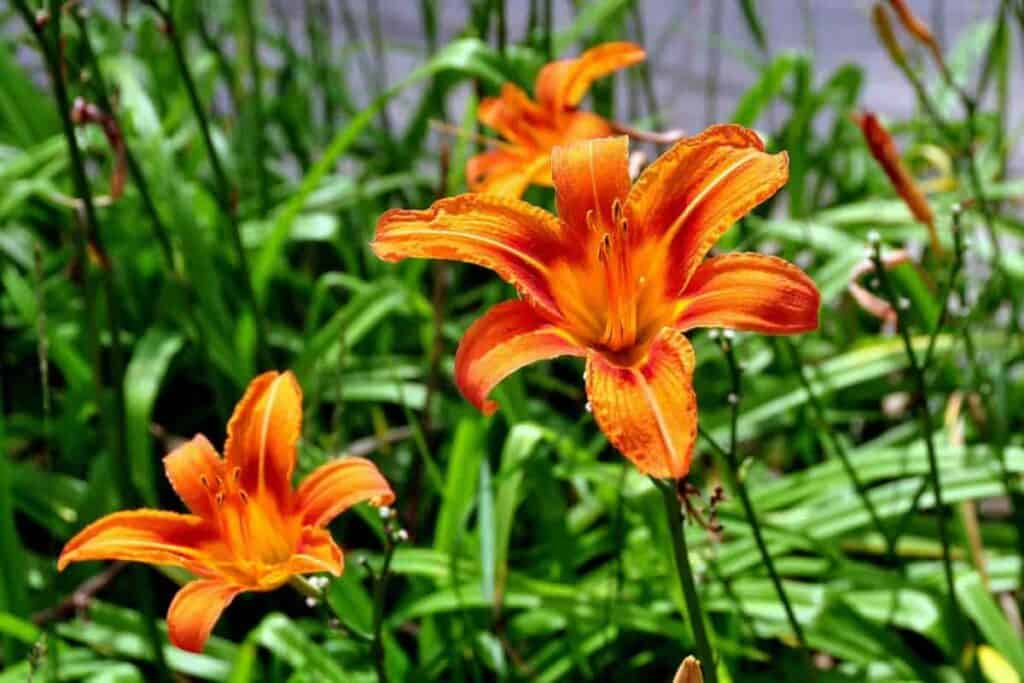
In addition, they’re quite free from insect pests and diseases and feel at home in almost any part of the garden, even with little care.
What’s more, they now come in so many shades of pink, red, cream, purple, and bicolors that the most color-conscious gardener has no reason for complaint.
Although they’ll grow well under neglect, they’ll respond readily to good care. But even this is simple.
Selection Of Good Site
Selecting a good site is the first essential for a striking display all season. Daylilies bloom more profusely in the direct sun most of the day.
They should at least have the sun up to midday; after that, part shade may be advantageous for those varieties that tend to wilt or fade during the day’s heat.
Such wilting and fading are more likely with the light yellow varieties whose flowers have opened the previous night and with certain reds, pinks, lavenders, and purples.
These conditions prevail more often on days when both the humidity and temperature are high and when the plants have been making rank succulent growth.
Site And Soil
The ideal soil for hemerocallis is a moderately heavy clay loam. Sandy soil, with adequate moisture and fertilizer, is satisfactory. Also, heavy clay loam, provided water does not stay over the plants long.
Some of the finest plantings I have ever seen were in moist bottomland, along streams overflowing in winter or early spring, and on rich, moist soils along brooks or small streams.
Most daylilies do well in rock gardens, but they must not be allowed to dry out.
Soil (Neutral, Acidic, or Slightly Alkaline)
The foliage tends to become pale green or yellowish on very alkaline soils. Therefore, little fertilizer is required unless the soil is very poor.
Well-decayed compost may be dug in lightly around the clumps or spread over the soil’s surface between the clumps.
A light application of any good complete fertilizer may be put on in the spring. However, avoid large amounts of nitrogen; if much is used, the plants grow too vigorously and produce fewer and fewer brilliant flowers.
Planting and Replanting
Planting may be done in the spring or early autumn. After the summer blooming season, the plants begin to form new roots and shoots.
Older plants may be divided at that time, and the divisions replanted if you do it early enough in the season so that they may form an abundance of new roots and tops. A severe winter may kill the plants if they cannot do so.
When you buy new plants from a nurseryman, arrange to receive them for fall planting no later than the last week in September if you live north of Chicago. Otherwise, you had better wait and plant in the spring.
The new plants should be set at about the same depth as they grew originally (generally indicated by whitened leaf bases) and the soil formed around them.
Liberal watering helps to work the soil around the buried roots and encourages the formation of new roots.
Routine Care
During the growing season, little care is needed other than light cultivation and application of fertilizer as soon as in the spring as the ground can be stirred.
If clumps become dense and compact, they should be thinned out in early spring if this has not been done the previous autumn.
More flowers of far better quality are produced by clumps that are not crowded but are, instead, making several vigorous new offshoots.
If the soil becomes very dry by midsummer, give them a few good waterings. Then, after the blooming season has passed, cut off all the old scapes (flowering stems) and foliage to 3” or 4” inches above the soil.
Spraying Daylilies
Daylilies need little spraying because they have few diseases which can be controlled by spraying. There are, however, three abnormal conditions that may detract from the garden appearance of the plants.
A few varieties which are not fully winter-resistant, such as Golden West, sometimes produce a few yellowed and twisted leaves early in the spring, but this condition is soon outgrown.
Undesirable Condition
The second undesirable condition is the occurrence of yellow flecks over the entire leaf surface.
Such spots later turn brown, and the entire terminal portion of the leaf may wither and die. The pink variety Rosalind and some of its hybrids often show this.
Sometimes the loss of foliage is so extensive that plants appear open and sere at a blooming time unless another variety or another kind of plant with better foliage is used along with them.
Third Difficulty
The third difficulty is the rapid withering and dying of the flower scape with all its buds. This is followed by a yellowing of some or all of the foliage and a decay of the rhizomes beneath the soil, resulting in the temporary loss of all bloom.
Usually, the plant recovers and grows again in subsequent seasons and soon is thriving as well as ever.
Insect Pests
As for insect pests, the trip may cause serious damage, in some cases, distortion of the buds and complete loss of flowers. This injury may occur before the flowering stems emerge from the crown, so the whole plant is deformed and killed.
Injury occurring later results in misshapen, discolored buds, and flowers that may not open or are much deformed.
This pest may be controlled by spraying with one of the DDT mixtures, either early in the spring or late in the fall.
Also helpful is a liberal sprinkling of dry flowers of sulfur on and about the crowns of the plants early in the spring or during the summer.
Sometimes wasps and mud-daubers may injure daylily buds by gnawing at them while gathering nectar from small glands on the hacks of bud sepals. The use of 5% percent DDT dust may help lessen this damage.
Selecting Good Varieties
There is a wide selection of varieties, but I shall set down my ideas on what I should demand in daylilies for my garden.
In making a planting, I would first consider the season and length of bloom so that I would have a continuous season of bloom.
Vigor is essential; the plant should grow well but not spread so much that it invades the territory allocated to other plants. The foliage mass should be compact and tall enough to provide a foil for the flowers but not obscure them.
It should be an attractive green that blends well with the flower colors. Preferably, there should be many graceful, upright scopes per plant in good proportion to the size of the flowers and foliage mass.
There should be ninny flowers per scape—25 to 50—to provide a continuous period of bloom for at least 4 to 6 weeks.
The flower should be borne gracefully on the escape; if below the line of vision slightly pointed upward; if above it, slightly inclined.
The faces and throat colorings are much more attractive than the backs of the flower parts.
Should like a variety of flower forms, from narrow-petaled, twisted forms to more substantial flowers, with broad segments of a heavier texture, deep and tubular or fiat and reflexed.
The tones and shadows of some of the light-colored tubular forms surpass any description of their beauty.
Daylilies I Like
I would suggest that the garden have at least three-fourths of the varieties in yellow. Yellow lilies provide lightness, luminescence, sparkle, and much-needed contrast for the darker and more subtle colors.
The daylily flowers should be fully expanded by 8:30 A.M. and remain open until at least 10 P.M.
Many sleepyheads are barely open by ten o’clock in the morning and begin to close by five o’clock in the afternoon.
An evening stroll in the garden is so pleasant that I would prefer to have enough of the flowers still open, luminous, and faintly fragrant then.
The following varieties are those that please me. Most of them may now be regarded by hemerocallis fanciers as old-fashioned.
Still, nearly all are inexpensive, readily available, persistent in the garden, and a source of long-continuing pleasure throughout the season.
Late-flowering Tulips
These early daylilies follow or perhaps overlap the late-flowering tulips. Of course, I would want the following:
- FLAVA, the old lemon lily of such delightful color
- Fragrance and the more recent low-growing BRUNETTE, a live mahogany brown.
- APRICOT forms dense masses as it ages which are covered with a wealth of golden flowers.
- BETTY and ELIZABETH are similar, deep chrome in color with widely flaring broad petals.
- GOLD DUST is free-blooming, a pleasing soft yellow emphasized by a chocolate reverse, but it has few flowers per scape and presents an untidy appearance because its withered flowers are not shed promptly.
- FLAVINA is a pleasing light yellow, rather sparse of bloom until well established, but when established, very much worthwhile.
For Midseason
Overtopping these varieties and acting as an excellent transition for the later-flowering varieties is SEMPERFLORENS, a large clear yellow with heavy substance and a wealth of bloom.
By late June, wide varieties begin to flower, with the height of the blooming season coming about mid-July. BUCKEYE is a pleasing clean yellow with a contrasting dark eye.
J. S. GAYNOR is as near to an ideal bright yellow as we may ever expect. It has splendid substance, wide full petals, and an abundance of stapes and flowers per scope, all well proportioned.
You can expect at least 6 weeks of bloom from it. Gout of OPHIR is similar in color but somewhat taller.
Choice Of Yellow
Three very light yellows, DOE SKIN, FAR NORTH, and VESPERS are outstanding.
VESPERS is night-blooming, with ruffled petals and a delightful aroma, but it tends to fade and wilt slightly on hot, bright days. Shade in the afternoon tends to prevent this.
Moreover, QUAKER is a taller, larger light yellow of splendid quality.
There are two CRESSIDAS, an early yellow and a later one. The latter one, a tawny orange with a frosty sparkle, has an abundance of long tubular flowers.
HYPERION, a satisfactory lemon yellow, is large and free-blooming, while MISSION BELLS has delightful soft yellow flowers that are abundant on rich soils if the size is desired.
Moreover, MONGOL is one of the largest dark yellows. Although the texture of its flowers is a bit thin, they last well.
And GOLDEN WEST is outstanding but not wholly winter-hardy.
MRS. W. H. WYMAN is an outstanding late, broad-petaled, soft golden yellow.
Extremely free-flowering, it bows to the late daylilies, handing the garden over to DOROTHY McDADE, a large late yellow with a glorious wealth of bloom.
AUGUST PIONEER and AUTUMN PRINCE bring the season to a colorful close. Neither has a spectacular flower; their real value is in their late bloom.
Pink Daylilies
CHENGTU and HANKOW are nearly as late but more attractive, especially CHENGTU. Its red copper blends well with autumnal foliage.
If you prefer bicolors, CABALLERO and BICOLOR are brilliant and effective.
Of the pinks, SWEETBRIAR is large and vigorous but rather dusky. TALISMAN is even duskier, but its elusive coloring is arresting.
MINUET (NESMITH) is much more subtle, and the clear and delicate cream and pink contrasts of LADY GAY are superb.
Red Daylilies
Of the reds, PORT, which has a medium-sized flower of pastel red, is a free-blooming semi-dwarf, ROYAL RUM is especially brilliant, and RUBY SUPREME is large and good but may be injured during severe winters.
I feel that red daylilies are overpowering and would prefer only a few in any planting. All of the purples are dull; some of them fade badly in the sun.
Lighter clear bluish purple day-lilies and pure white ones, when they become available, will make valuable additions to the garden.
This list represents a selection from a collection of more than 1,200 forms grown in Chicago, Illinois, and Lake Geneva, Wisconsin. Many other daylilies are just as lovely and worthwhile for your garden.
Soil Preparation
Unless it is already rich in humus, it is best to add generous amounts of rotted leaf mold or black hyper humus and plant food such as bone meal, superphosphate, and natural organic fertilizers.
It is wise to avoid the usual chemical fertilizer, which sometimes results in disease. In no case should you use alkaline agricultural lime. Crushed limestone is safe and should be used where the soil is excessively acidic.
Transplanting Iris
Transplanting is perhaps the most important operation of successful iris growing. After two or three years, the iris clumps become crowded, and the rhizomes climb over each other and, if not replanted, do not receive sufficient nourishment from the soil.
When crowded, the clumps generally lack vigor and have a sparse bloom. To revitalize the iris, the whole clump should be lifted and the rhizomes separated by pulling them apart from the old center or `mother” rhizome, which is dried and mummified by this time.
Make the cuts clean if you divide the clump into single rhizomes or several connected ones.
Using Rhizomes
When planting, set the rhizome or the larger division on a mound of earth in a shallow hole, large and deep enough to accommodate the fibrous roots.
Spread out the roots, covering them with earth so that the tops of the rhizomes are just barely below the surface of the ground.
The soil about the plant should be firmly tamped, and the new planting should be watered thoroughly if the ground is dry.
Planting Distance
How far apart you plant a bearded iris depends upon whether you have only one root, as is usually the case with newly purchased rhizomes, or whether there are several due to dividing an old clump.
Single rhizomes are usually planted 3’ to 4’ feet apart in each direction.
After they have developed into a clump in two or three years, they should be lifted, divided, and replanted to give larger groups for color effect in the mixed border or elsewhere.
To form a large clump, use from three to seven rhizomes of one variety, spacing the roots 6” to 10” inches apart and at least 5’ or 6’ feet away from the nearest large clump.
A good plan is to set them in place in such a way that the finished planting looks like a triangle or an oval, with all fans facing in the same direction.
Iris set out in midsummer will usually resume active growth during the fall, provided they are watered occasionally during dry spells.
They blossom the following spring but of course, do not give optimum bloom until the second spring.
Winter Protection
Giving newly-planted iris protection the first winter is advisable, especially if the plants are not set out until after Labor Day. This will prevent them from being heaved from the ground by alternate thawing and freezing during open winters.
I have found Excelsior the best material for winter mulch. It is light and fluffy and does not melt.
This winter covering should be removed very early in the spring to prevent premature growth. When the covering is taken off, the plants should be firmed down if they are loose.
Do a “spring cleaning” job on older, established clumps as early as possible, removing the old withered foliage from the previous year. Doing this minimizes the chance of infestation from the iris borer.
Control Of Iris Borer
The iris borer hatches in the spring when the ground temperature reaches 70° degrees Fahrenheit, usually about May 1 in the vicinity of New York City.
The borer pierces the iris foliage as a small worm and gradually grows in size by feeding on the succulent new foliage within the sheath of the leaf.
If not eliminated, it will gradually work itself down into the rhizome and consume a large portion of it while attaining its full size of close to two incites by mid-July.
Killing The Iris Borer
The iris borer first becomes noticeable when the new inside shoots of leaves show serrated edges with a slimy exudation.
In its early stages, the borer can be killed by pressing the foliage between the thumb and forefinger or cutting off the infected leaf between the point where the borer is working and the top of the rhizome.
Sometimes it is possible to extricate the borer from between the leaves with the point of a knife. However, the best defense against this pest is a good offense.
Dust or spray young foliage early in the spring, at about 10-day intervals, with a good insecticide, preferably one containing DDT.
Several combination insecticide-fungicides are now available, which will control the iris borer and iris diseases.
Disease Control
One of the most troublesome iris diseases is bacterial soft rot, which attacks the rhizome itself and is characterized by a soft, foul-smelling decay.
Some injuries may be caused to the plant, lack of drainage, or excessive use of chemical fertilizers.
When it occurs, the decayed portions of the rhizome should be cut off promptly, and the open cut disinfected with such preparations as Fermate or Phygon.
If a considerable portion of a clump is affected, it is often necessary to dig up the whole clump and replant the sound rhizomes after they have been disinfected.
There are kinds of leaf spots, fungi, and bacteria, which, while they do not destroy a plant, often disfigure the iris foliage and thereby reduce the size of the rhizomes.
Another iris disease is mustard seed fungus, which is closely allied to a similar disease found in delphiniums.
It usually occurs only in densely matted clumps and defoliates the plants if allowed unchecked.
All three of these diseases can usually be remedied by more frequent replanting and by dusting with a combination of insecticide-fungicide early in the spring. These diseases are seldom a threat to properly cared for iris.
Cultivation Of Iris
Cultivation around the bearded iris in the spring should be very shallow to avoid injury to the fibrous roots, usually near the ground surface. It should be done only to keep down weeds.
After the flowering season is over, remove old flower stalks by cutting them off flush with the tops of the rhizomes at ground level. This permits light and air to penetrate the clump and helps keep it healthy and growing.
44659 by E. J. Kraus